Beacause I tend to ramble.... key words in the post below have been highlighted to allow for quick scan-reading for the lazy.
Saturday...
saw a bit of shopping for the imminent arrivals of our newest family members, two little Devon Rex kittens.
I also took the chance to head to Bunnings to get the gardening supplies I've been wanting to get for a while. Oh... and Rhys wanted a catnip seedling kit so that went in the trolley too. All up, pet and gardening goods totalled $140, a lot of money for me to spend in one hit these days.
Once home I gave my potted basil a much needed transplant into two ceramic pots. They were so root-bound I felt ashamed for having neglected them all this while. I am wondering how well they will survive transplanting with, admittedly, plenty of torn roots in trying to separate them. I opened and started the catnip growing kit. I then raked up the back-yard after Rhys had mowed and collected the liquid fertiliser from my worm farm. Phew! But it was a good day to be out and in the sunshine.
Some laundry, washing up and a clean of the shower thrown in there somewhere.
Sunday...
I quickly made a food plan for the week then hit the local market and supermarket for the fortnight's groceries.
Sometimes I find it amazing how quickly money adds up. $20 here for a set of decora containers, $20 there for some women's multi-v tablets, $10 here for some bread flour and $5 for peppercorns in a mill and suddenly I'm up at a $98 supermaret bill! I haven't seen a shopping bill that high for a while and I became skittish as I watched the tally rise. But I reminded myself that everything in the trolley was needed and it was just unfortunate that I had to buy them all at the one time. The total between the markets and supermarket of $125 is still less than my budgeted allowance for food for the fortnight so all is well.
Once home I put on the breadmaker, made some gnocchi, made some cookies, experimented with how to alter bought natural yoghurt to make it more to my tastes and started my first attempt at making yoghurt.
Unfortunately this morning show my first yoghurt attempt to be a failure. The consistency was was more like those delicious yoghurt drinks you can buy and when I began to strain it through muslin I realised that any yoghurt solids remaining wouldn't be worth the amount of milk wasted in the attempt. I must have done something wrong. I think perhaps it was too cold overnight so the bacteria's process was halted. I'll buy some more milk later this week and try again but this time early in the morning to cure in the warm oven during the day. Anyone have any tips for making it work better next time around?
On the other hand the cookies, my own recipe creation, were a raging success - at least with Rhys who I had to smack away from the cookie jar. I fear to look and see what damage he did late at night once I was asleep!
Also, my gnocchi attempt was successful. I use the term 'successful' rather loosely as though the result was pretty darn delicious once baked with a cherry-tomato and white wine sauce it didn't seem worth the amount of fiddly, time consuming work involved in making the gnocchi.
Vaccuming in the late afternoon finished off the day nicely.
Such a lot of weekend business!
Sunday, August 2, 2009
Sunday, July 19, 2009
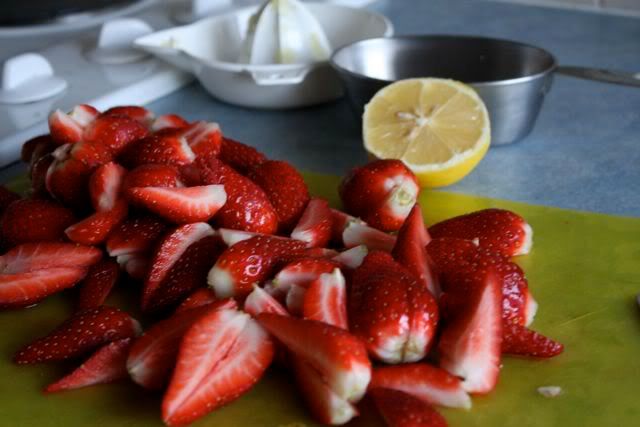
Strawberry & Cardamom Cordial
One of my (numerous) hobbies is historical reenactment. This upcomming weekend will find me, dressed in pretty Regency clothes, at the only fort in Brisbane. Two days on the edge of the cold Brisbane bay in Winter deserves some good food so I set about finding recipes from the early 19th century to make and take.
In Regency (Jane Austen) times, cordial was a term used for a sweetened liquid given to invalids. What we refer to as cordial in Australia today was called 'waters'. So the recipe I made would be called:
Strawberry & Cardamom Waters
 Hull and halve the strawberries. (Mine were large suckers so I quartered them.)
In a saucepan stir the water, castor sugar and fresh lemon juice over low heat until sugar is dissolved. Raise the heat and simmer the liquid until it has reduced to a light syrup.

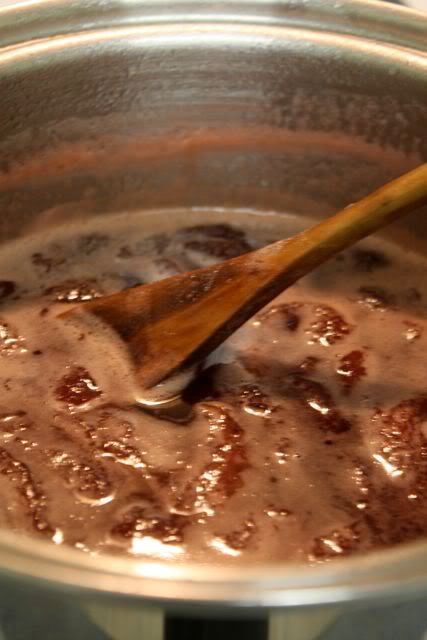
Add the strawberries and dried cardamom pods (I put mine in a tea caddy so they wouldn't be hard to remove from the strawberry pulp at the end). Simmer this for about 20 minutes.
Let cool for another 20 - 30 min.
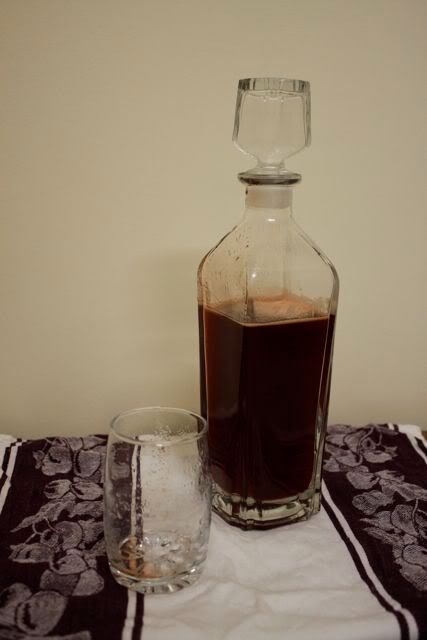
Discard the cardamom seeds. Strain all syrup from the liquid through a fine sieve. (This may take some time!) Bottle in a sterilised bottle and voila! Delicious but very rich cordial.

In Regency (Jane Austen) times, cordial was a term used for a sweetened liquid given to invalids. What we refer to as cordial in Australia today was called 'waters'. So the recipe I made would be called:
Strawberry & Cardamom Waters
- 2 cups water
- 2 cups castor sugar
- 2 tab lemon juice
- 2 x 250g punnets of strawberries
- 1/4 tsp cardamom seeds
 Hull and halve the strawberries. (Mine were large suckers so I quartered them.)
In a saucepan stir the water, castor sugar and fresh lemon juice over low heat until sugar is dissolved. Raise the heat and simmer the liquid until it has reduced to a light syrup.
Add the strawberries and dried cardamom pods (I put mine in a tea caddy so they wouldn't be hard to remove from the strawberry pulp at the end). Simmer this for about 20 minutes.
Let cool for another 20 - 30 min.
Discard the cardamom seeds. Strain all syrup from the liquid through a fine sieve. (This may take some time!) Bottle in a sterilised bottle and voila! Delicious but very rich cordial.
Saturday, July 18, 2009
Little Things
Because I've been doing so many text-heavy posts lately and because this song inspires me...
There's so many things that we miss in our everyday lives.
We're so busy hustling, bustling, chasing far-away dreams
that we forget the little things
like blue skies, green eyes and our babies growing,
like rainbows, fresh snow and the smell of Summer.
We forget to live.
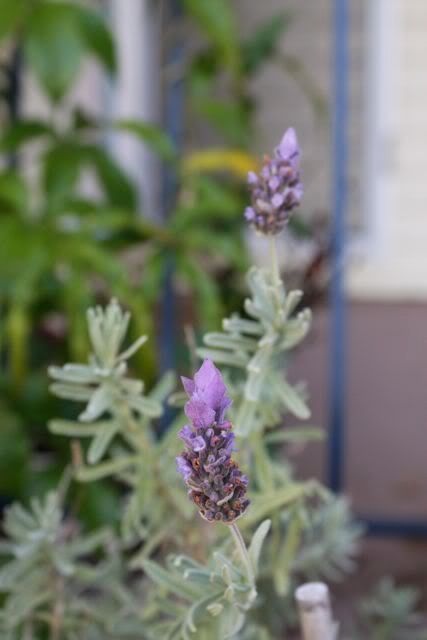 Lavender growing beside my front steps
Give us eyes like children so we live each day as our last.
We're so sure we know so much that we forget to listen.
Then we want the fickle things;
Like cheap thrills, fast fuel and constant consumption,
Like TV, CDs and cars that speak our names.
We forget to live.
We're so sure we know so much that we forget to listen.
Then we want the fickle things;
Like cheap thrills, fast fuel and constant consumption,
Like TV, CDs and cars that speak our names.
We forget to live.
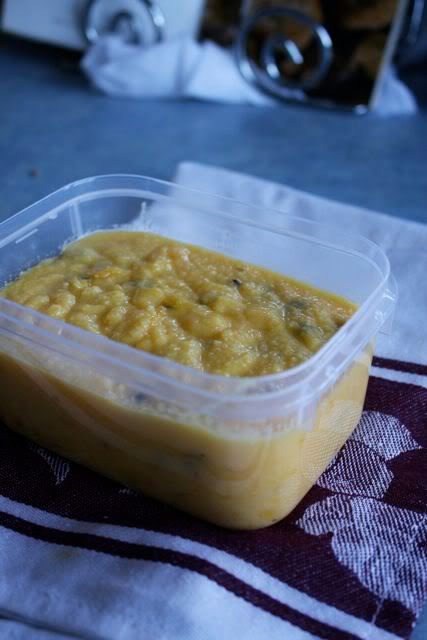 Passionfruit curd - delicious warmed up and served on icecream.
There's so many things that we miss in our everyday lives.
We're so busy hustling, bustling, chasing far-away dreams
That we forget the little things.
Like blue skies, green eyes and our babies growing.
Like rainbows, fresh snow and the smell of Summer.....
We're so busy hustling, bustling, chasing far-away dreams
That we forget the little things.
Like blue skies, green eyes and our babies growing.
Like rainbows, fresh snow and the smell of Summer.....
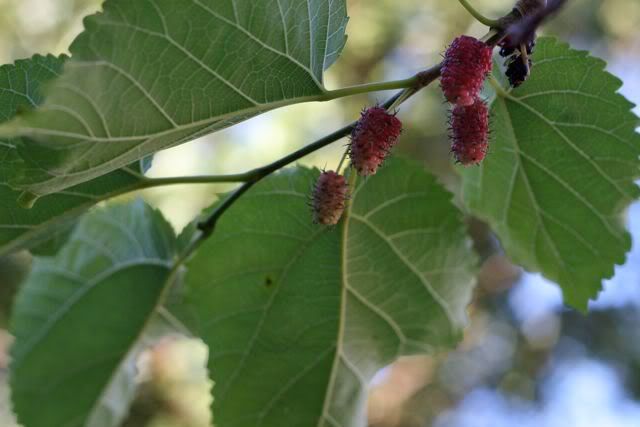 Winter Mulberries in my garden
We forget to live.
(lyrics by Lamb - Little Things)
(lyrics by Lamb - Little Things)
Biggest Kitchen Table Audit - Electricity & Water
Water Usage
I've been pleasantly pleased at the figures on our water invoice lately but there are always more things I could do to reduce water use even further.
Our electricity bill, on the other hand, has gone from bad to worse. Over Summer Rhys used the air conditioner in our bedroom almost non-stop. This left us with a bill of $320. Since then I'd made a huge effort to turn off lights, and to turn off appliances at the wall, including the microwave, when not in use. So when we got our next bill I was horrified to find that our electricity usage hadn't gone down... it had actually risen so we were paying $430.
We are not entirely sure what to attribute the huge jump to.
It could be Rhys' heavy use of a bar heater that he said sucks energy like a leech or the addition of 3 computers to the household (ontop of our existing 2), all running 24-7. Or it could be that I've actually started cooking rather than just occasionally using the microwave. Our stove and oven run on electricity so with the amount of cooking and baking I've been doing compared to the previous lack of any cooking at all could be a contributing factor.
Ways that I could reduce the use of electricity in our house:
I've been pleasantly pleased at the figures on our water invoice lately but there are always more things I could do to reduce water use even further.
- Reduce the number of loads of washing done in a fortnight.
- Wash vegetables and fruit in a sink or bowl of water rather than running water.
- Consider ways to reuse cooking water that has only been used for boiling (perhaps use this for garden watering?)
Our electricity bill, on the other hand, has gone from bad to worse. Over Summer Rhys used the air conditioner in our bedroom almost non-stop. This left us with a bill of $320. Since then I'd made a huge effort to turn off lights, and to turn off appliances at the wall, including the microwave, when not in use. So when we got our next bill I was horrified to find that our electricity usage hadn't gone down... it had actually risen so we were paying $430.
We are not entirely sure what to attribute the huge jump to.
It could be Rhys' heavy use of a bar heater that he said sucks energy like a leech or the addition of 3 computers to the household (ontop of our existing 2), all running 24-7. Or it could be that I've actually started cooking rather than just occasionally using the microwave. Our stove and oven run on electricity so with the amount of cooking and baking I've been doing compared to the previous lack of any cooking at all could be a contributing factor.
Ways that I could reduce the use of electricity in our house:
- Get a second powerboard with switches to use for the game consoles and TV so they're not always on standby.
- Hurry up and finish knitting a blanket for Rhys so he won't use the bar heater.
- Find a less power-hungry alternative to the bar heater for those times when it's too cold without some kind of heating source.
- Talk to Rhys' parents about getting insulation put into the house - a good time considering the government grants available.
- Try to convince Rhys to get rid of his 2nd computer which seems to serve no good purpose (though I'm sure he'll tell me there is one!)
Wednesday, July 8, 2009
Biggest Kitchen Table Audit - Disposables
So much hullabaloo is made about plastic bags that it never occurred to me to look past those pesky plastic carriers to see the other disposables in my home and life that I could do without for the benefit of our environment.
A few of the blogs I've been reading of late have changed that and the next point for thought at the Biggest Kitchen Table audit has made me think on it further still.
What disposables are in my life that I want to be rid of? What can I do to replace them with a reusable substitute?
Plastic bags
- Make some more shopping totes.
- Buy a market basket.
- Say no to plastic bags when I can carry the items or put them in another bag.
- Put some shopping tote bags in the car so I don't forget them when I go out.
- Don't get much use in our house anyway. Mostly just there for parties/BBQs.
- Make a set of 20 fabric napkins.
- As Rhonda suggested in her entry, cut up an old towel and overlock around the outside.
- Keep the reusable rags handy for quick use.
- Lunches and cookies are now taken to work in tuppawear containers.
- Get some flat tupperwear containers for use when freezing meat.
- Store cheese wrapped in waxed paper (apparently much better for hard cheese storage anyway!) and a more permanent plastic container for parmesan and dry cheeses.
- Reusable piping bags.
- Waxed paper for chocolate piping (works best anyway).
- I've already bought an aluminum water bottle for work (100% recyclable. Never to be used for hot water or acidic drinks. I intend to use this for cold water only so no danger of leeched chemicals.)
- Buy a stainless steel water bottle for home and another small one for out-and-about.
- Encourage Rhys to drink more green tea and less softdrink. Stop buying soda water.
- Use any large softdrink bottles for useful purposes (e.g. as mini greenhouses for seedlings).
- I've already stopped buying disposable chux and replaced them with textured cotton dishcloths (Woolworths have a home-brand of these). I need to buy a few more so that I have a large supply to ensure they get cycled and washed very regularly.
Apologies to my male readers who may not want to hear about it... feel free to skip this point!
- I've been investigating the possibility of using a menstrual cup rather than the usual disposable products. There are a number of makers on the market so I'm doing some look-around to determine who supplies to Australia and what reviews they've got (usually they get rave reviews on the pregnancy/mothering forums!).
- I need to buy some handkerchiefs
- I've already been buying hand-made shea soap from our local markets and slowly Rhys has become used to it rather than his favourite individually wrapped Pears brand translucent soap.
- Also I've been buying bulk refill packs of liquid soap and washing powder. Buying in bulk means less packaging is required. (I don't buy individually wrapped items except when it can't be helped.)
- I want to learn to make my own soap both for the shower and to replace the liquid soap. I may get some resistance from Rhys regarding the liquid soap.
- I have been sticking (as best I can) to the goal of making most of my food from scratch at home. Though this doesn't entirely eliminate packaging from my household waste (I still have to buy flour, dried pasta and other ingredients for cooking) it makes a difference. No more biscuit packaging. No more packet meals or noodle box packaging.
- I intend to always buy food in bulk where possible.
- We don't buy newspapers but the free local papers get delivered regularly and I'm guilty of occasionally reading the farce of journalism known as MX. Rather than disposing of these I need to store them for use in gardening, composting, worm farming and cleaning mirrors.
- Toilet Paper.
- Cling wrap (too many uses in baking, especially dough.)
- I already have a worm farm to help turn kitchen scraps into fertiliser.
- I need to build a 3 box composting system.
- I need to get my chickens to help eat the excess food scraps from worm farming.
- I need to work toward improving my use of food so there aren't so many scraps. (i.e. ensure food is stored properly so it doesn't go off and therefore binned.)
Monday, July 6, 2009
Biggest Kitchen Table Audit - Food
The next topic of discussion at The Biggest Kitchen Table was food.

What have I done so far to improve the quality of food in my diet, to make my food socially responsible (ethical, environmentally sustainable etc), to lower the costs and to remove unnecessary preservatives and chemicals from my meals?

I'm only human so occasionally I stumble and buy a KFC snack box or buy more vegetables than I can use before they go off... but I'm getting better all the time.
What I'd like to change or put in place:
1) Get chickens, big, fat, plump egg makers (who will also help with disposal of kitchen scraps and produce excellent nitrogen boosting poop for my compost and garden).
2) Build a 3 box compost system.
3) Begin a small vegetable garden (using heritage seeds and organic gardening methods, with a smattering of permaculture concepts thrown in)
4) Plant some fruit trees - especially some awesome, unusual and exotic ones like chocolate pudding fruit.
5) Learn how to make yoghurt, cottage cheese and then hard cheeses.
6) Learn the best way to store food items so they last the longest.
7) Get a pasta roller and make my own fresh pasta and gnocchi.
That all feels a bit overwhelming so I'm going to stop there before it feels unachievable.

What have I done so far to improve the quality of food in my diet, to make my food socially responsible (ethical, environmentally sustainable etc), to lower the costs and to remove unnecessary preservatives and chemicals from my meals?
- Make meals from scratch.
- Buy basic ingredients (no packet mixes).
- No longer buy packaged baked goods but rather make them.
- Eat home made bread and make homemade pizza bases.
- Drink water, tea and home made cordials - no more softdrinks or nesquick.
- Buy food in bulk where possible (makes it cheaper and less packaging to dispose of).
- Buy all vegetables at a local fruit and veg market.
- Shop for dried groceries with Australian owned and made as preferences.
- Almost never buy take-out.
- Take lunch to work (leftovers from dinners and baked treats for morning and afternoon tea).
- Buy meat only once a month or less (meat is an essential part of our diets but not to the extent that most people eat it and there is a huge amount of grain used in farming meat).
- Consider the best way to use an ingredient to get the most out of it - for example, if I have a steak of beef I will not cook it as a steak with vegetables and gravy - because that will feed me for one meal. Instead I will dice it up and use it in a stir fry which will last me 4 - 5 meals.
- Use up leftovers rather than letting them go to waste and freeze meals to save them.
- Have a worm farm to help dispose of food scraps in a way that is beneficial to my (future) garden and keeps food from rotting and creating methane in landfills.
- Harvested and used macadamias from our tree and basil from the pot in my cooking and baking.

I'm only human so occasionally I stumble and buy a KFC snack box or buy more vegetables than I can use before they go off... but I'm getting better all the time.
What I'd like to change or put in place:
1) Get chickens, big, fat, plump egg makers (who will also help with disposal of kitchen scraps and produce excellent nitrogen boosting poop for my compost and garden).
2) Build a 3 box compost system.
3) Begin a small vegetable garden (using heritage seeds and organic gardening methods, with a smattering of permaculture concepts thrown in)
4) Plant some fruit trees - especially some awesome, unusual and exotic ones like chocolate pudding fruit.
5) Learn how to make yoghurt, cottage cheese and then hard cheeses.
6) Learn the best way to store food items so they last the longest.
7) Get a pasta roller and make my own fresh pasta and gnocchi.
That all feels a bit overwhelming so I'm going to stop there before it feels unachievable.
Sunday, July 5, 2009
Down To Earth - Biggest Kitchen Table Audit
Rhonda Jean, the author of the Down To Earth blog, has made a call-out to her readers to join her in another Biggest Kitchen Table, this time an audit, or stocktake, of our lives and goals on our path to simplicity.
The first topic for consideration was money and finances.
My control over my finances has made me so proud of myself. It might sound a silly thing to be proud of to those who have had their spending neat and sorted. For me, it was a big effort to stop spending as frivolously, wildly and with cheery abandon as I had been. I was a habitual consumer for immediate satisfaction and not looking to the bigger goals in my life I would need money for.
The way I took control was to create a budget and then set up my bank accounts.
Creating the Budget
I created my budget on an excel spreadsheet which looked like the equation below.
Fortnightly Income
minus expenses
I ensured that I listed all expenses calculated down to the fortnight figure even the annual ones like registration.
minus big savings
I then decided on a figure that I wanted to save from each pay and deducted it from the running total figure. This savings would be first and foremost a 'safety buffer', but also for our wedding and then later for a home deposit.
minus repayments
Previously we had bought a TV which we got on one of those 'pay nothing for 12 months' arrangements. I took the figure of how much I had to pay before the 12 months deadline and then divided that by the number of months remaining.
An interesting note: When we had to use my savings as a safety buffer, like when the car broke down and cost us $1000 to fix, we treated this as if it were a loan from my savings. I included a payback savings figure in the repayments section and included payments to replenish my savings.
minus small savings
The small savings showed an amount I wanted to put aside each pay towards some short term saving goal that would cost more than my allowance but less than our wedding.
minus food budget
Originally I budgeted for $200 of food a fortnight based on my previous grocery shopping experience. This has since been tightened up a great deal and my allowance relaxed a little.
remainder is allowance and small incidentals
Originally I set a fortnightly allowance of $100 which included any activity or purchase I wanted that wasn't groceries or incidentals like medication. I still aim to spend only $100 but since my food budget has tightened I've relaxed my allowance a little. When I get my kitten I expect my expenses will change and I'll have to reconsider my allowance figure.
So my forntightly income was broken down to the last $5 of how it was to be portioned out between my needs and wants... but it was all still just pixels on the screen. How was I going to put it in practice? How was I going to ensure that all those expenses, repayments, savings were going to the right place?
Electronic Envelopes
A popular way of sticking to a budget is to have different envelopes/jars/pouches labelled with one of the expenses of the budget. Money is portioned out to the envelopes and used when the bill/expense is due.
I've implemented a similar method but rather than using physical envelopes and dollars I've opted for an electronic envelope system.
My bank allows for a number of 'sub accounts' to be connected to a main account connected to two cards, an eftpos/ATM card and a debit card. I've created a sub account for small savings, another for bills, another for repayments and another for savings. When my pay comes into my main account I use online banking to shuffle money into the various accounts according to my budget.
The money that remains in my pay account is my spending allowance, incidentals and food budget.
Where possible I make payments on my eftpos card or the debit card used as a credit card. This way I can see where my money has been spent and track my spending habits. Cash has a tendency to disappear from my wallet without a trace.
Changes I want to make in the area of finances
We are currently so under-insured that it is not funny. We need to get health insurance and home contents insurance. This is going to require a reshuffling and tightening of the budget.
I currently owe my big savings account $300 for the latest repairs to our car. I want to pay this back as soon as possible.
I want to add into my budget a HECS (university government loan) repayment figure so at the end of each financial year I can make a bulk payment off my account and get the benefits of a discount on the amount owed and reduce the total amount when it comes time to be reindexed. (If you pay a lump sum of $500 or more, the government will reduce your debt by 10% of your payment).
Now that I have my half of the TV loan paid off, my next small savings project will be to buy a chook-pen and some laying hens.
Two kittens coming into our house soon will change my expenses slightly so I will have to rejig my budget for that.
I want to create a joint high-yield savings account with Rhys for our home deposit.
Friday, July 3, 2009
Review - Lush Oxeo Cube Deoderant
For a while now I have been wanting to rid myself of deoderants with unnecessary nasties like aluminum compounds, parabens and talcs so I was rather pleased when I saw that Lush have a range of deoderants without any of these ingredients.
Lush are a company with a conscience. They won't buy any ingredients from companies that test on animals. Nearly all of their packaging is in paper, which they encourage you to throw on your compost heap once used. They use fresh and natural ingredients and avoid putting preservatives or possibly harmful chemicals in any of their handmade products. You can see more about their company ethics on their website: www.lush.com.au

I chose the Lush Oxeo Cube because of it's size, smell and texture. Lush carry a range of natural deoderants, some a hard, soap-like bar, others powder based. All of them smell WOW but the Oxeo Cube had a luxurious floral smell that I appreciated more than its sister product, the tea-tree cube.
The cube is a palm-sized lump of powder pressed into shape, held together by a yellow-wax back. The instructions say to rub into the armpits, preferably after just showering. At $10.50 I was willing to give it a try so I could get rid of my current roll-on deoderant.
First use:
I used the bar as suggested, directly after showering. I got a slight stinging/burning sensation in the area the bar had been used for about 10 seconds but I am not sure if this is linked to the fact I had just shaved my armpits before getting out of the shower. The smell was lovely and lasted all day, despite a great deal of hurrying and stress. It is currently Winter and so there is obviously less sweating happening than in the Summer months. I'll be interested to see if the bar performs as well when its hotter.
I'm going to give this a week of use to see if the stinging/burning is linked to shaved 'pits' or is a reaction my body is having to one of the ingredients.
Lush are a company with a conscience. They won't buy any ingredients from companies that test on animals. Nearly all of their packaging is in paper, which they encourage you to throw on your compost heap once used. They use fresh and natural ingredients and avoid putting preservatives or possibly harmful chemicals in any of their handmade products. You can see more about their company ethics on their website: www.lush.com.au
I chose the Lush Oxeo Cube because of it's size, smell and texture. Lush carry a range of natural deoderants, some a hard, soap-like bar, others powder based. All of them smell WOW but the Oxeo Cube had a luxurious floral smell that I appreciated more than its sister product, the tea-tree cube.
The cube is a palm-sized lump of powder pressed into shape, held together by a yellow-wax back. The instructions say to rub into the armpits, preferably after just showering. At $10.50 I was willing to give it a try so I could get rid of my current roll-on deoderant.
First use:
I used the bar as suggested, directly after showering. I got a slight stinging/burning sensation in the area the bar had been used for about 10 seconds but I am not sure if this is linked to the fact I had just shaved my armpits before getting out of the shower. The smell was lovely and lasted all day, despite a great deal of hurrying and stress. It is currently Winter and so there is obviously less sweating happening than in the Summer months. I'll be interested to see if the bar performs as well when its hotter.
I'm going to give this a week of use to see if the stinging/burning is linked to shaved 'pits' or is a reaction my body is having to one of the ingredients.
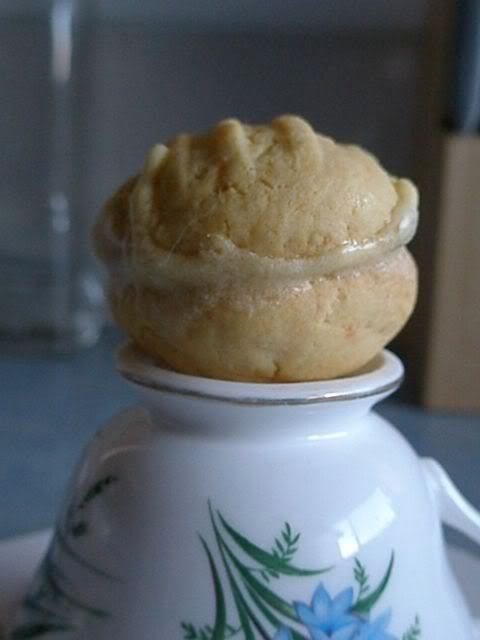
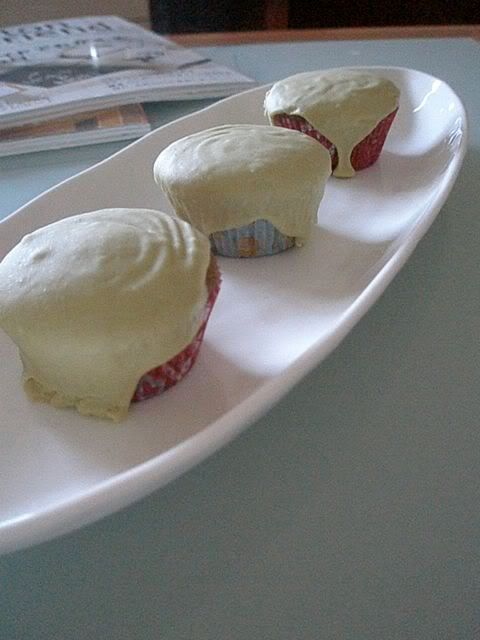
Sunday, June 28, 2009
A satisfying kind of weekend
I've had a weekend that felt satisfying and productive but in a nice, lazy kind of way.
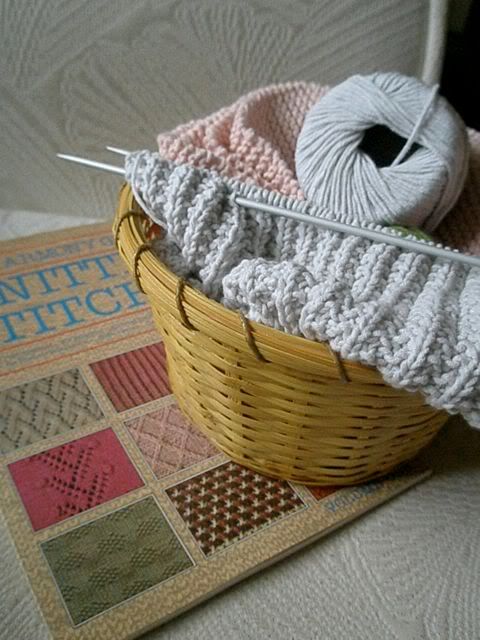
I knitted some more of my lap rug until I ran out of the colour I'm currently using.
I worked on a stitchery of cupcakes until I ran out of thread.
I then sewed up the 4th block of a block-of-the-month patchwork quilt I've been working on for the last 3 years.

I baked passionfruit melting moment biscuits.

Rhys' sister Lauren came over and we made Matcha (Japanese green tea) cupcakes with matcha butter-cream icing.
Our good friend Dan came over for dinner and Lauren shouted us all pizza and pasta for dinner.

I did 4 loads of washing.
I wrote a letter to a friend.
I sewed a dress from a pretty dusty gray-blue fabric I had bought a while ago for cheap - a project I started in the morning and finished in the evening.
A very productive weekend indeed!
I knitted some more of my lap rug until I ran out of the colour I'm currently using.
I worked on a stitchery of cupcakes until I ran out of thread.
I then sewed up the 4th block of a block-of-the-month patchwork quilt I've been working on for the last 3 years.
I baked passionfruit melting moment biscuits.
Rhys' sister Lauren came over and we made Matcha (Japanese green tea) cupcakes with matcha butter-cream icing.
Our good friend Dan came over for dinner and Lauren shouted us all pizza and pasta for dinner.
I did 4 loads of washing.
I wrote a letter to a friend.
I sewed a dress from a pretty dusty gray-blue fabric I had bought a while ago for cheap - a project I started in the morning and finished in the evening.
A very productive weekend indeed!
Wednesday, June 24, 2009
Onions - Something to Cry About
I was flicking through my handy household hints book, looking at the interesting tips when my eyes fell on the entry for Onions.
It made me think that I have heard SO MANY different tips for how to chop/slice onions without the teary eyes but none have ever worked for me. These are all the ones I've heard:
Has anyone got any onion cutting tricks they use (successfully) to avoid tears?
It made me think that I have heard SO MANY different tips for how to chop/slice onions without the teary eyes but none have ever worked for me. These are all the ones I've heard:
- Breathe through your mouth, not your nose. (Why this would work, I don't know!)
- Put the onions in the freezer for a few minutes first.
- Store your onions in the fridge rather than the cupboard.
- Plunge onions into boiling water just prior to peeling.
- Run onions under cold water for a few seconds prior to making the first slice.
Has anyone got any onion cutting tricks they use (successfully) to avoid tears?
Sunday, June 21, 2009
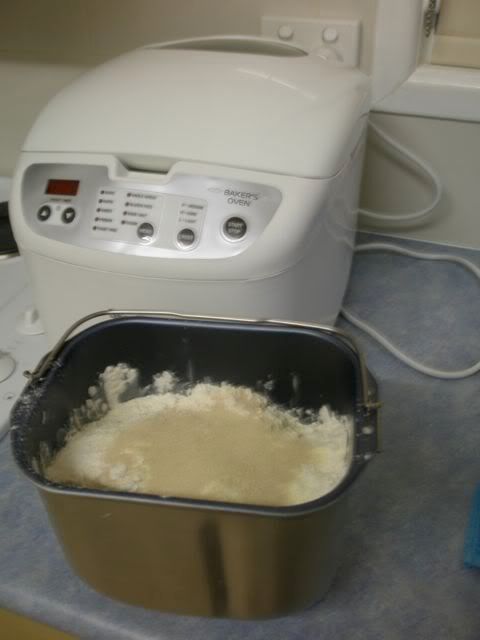
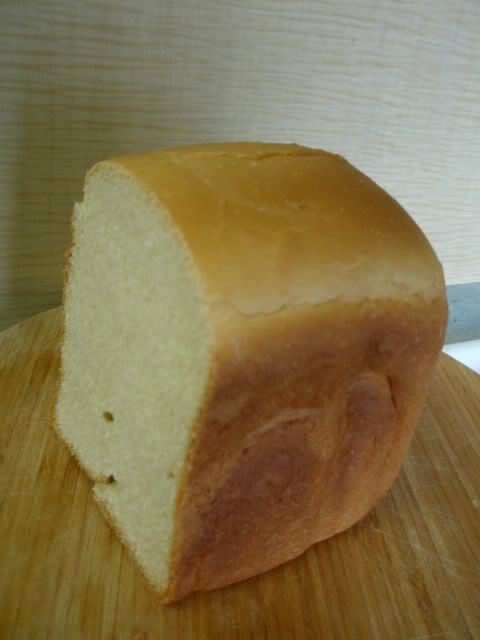
What I've been Doing (or Why I've Been So Quiet)
I know I haven't written in a while so thought it would be due time to write something - even if it's just a quick photo entry about what I've been doing and why it's been so darn quiet on here.
I bought a breadmaker which I've put through it's paces a few times - both making bread and pizza dough.

My newest niece was born. Shortly after, I put a deposit down for a very pretty little devon rex kitten. I played photographer for two friends at their wedding.

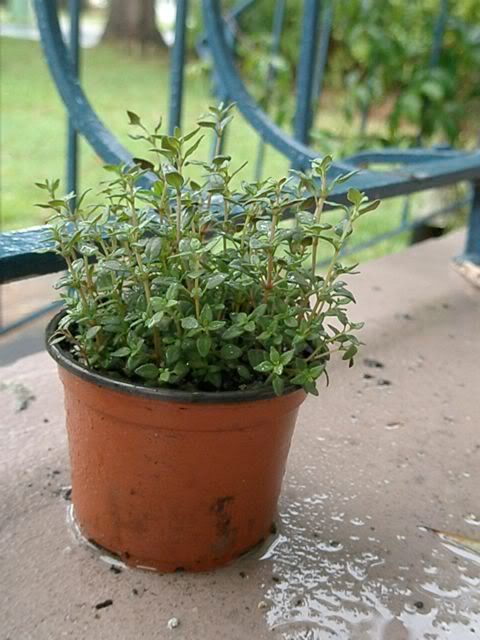
I bought some basil, thyme and English spinach plants from the inner-city Wednesday markets. The basil showed some signs of water stress until I put it out of the direct sun.

The thyme is thriving beautifully in full sun. The English spinach can't make up it's mind of whether it wants sun or shade... but I think all three badly need to be repotted. I'm constantly learning from my mistakes, so it seems. Not days after I bought these plants I read in a book that you should never buy potted plants which have roots growing out of their watering holes, something that is happening quite badly on two of these plants.

I had word from the breeder that the kitten I had chosen had died suddenly of a stroke or spider bite. I then caught the flu from Rhys. A miserable few days ensued.
While sick with the flu, Rhys cooked me a meal for the first time ever in our relationship. Granted it was only scrambled eggs, but it was a touching gesture from my boy who views the kitchen as foriegn territory which occasionally offers up tasty peace offerings to him. Then both Rhys and our best man Dan did the washing up for me while I was in fitful sleep. I could have cried for happiness when I woke up and realised they'd done it for me.
I've been continuing the long process of knitting a lap blanket and teaching myself new stitches. I'm up to the second 'stripe' of colour. The first stripe was pink in a plain knit. I'm doing the second, light grey stripe in a heavy rib stitch.

My little sister came for a visit from Sydney for her birthday. I was too sick with flu to go to her party or my elder sister's graduation party but did manage to take my little sister to the local markets on Sunday.
I've been learning to food plan before I go a-marketing... but that didn't stop me from getting too excited about the range of vegetables, leading me to buy some I don't actually need. Snow peas in the pod!

So that's a quick write up of everything I've been doing in the last few weeks.
I bought a breadmaker which I've put through it's paces a few times - both making bread and pizza dough.
My newest niece was born. Shortly after, I put a deposit down for a very pretty little devon rex kitten. I played photographer for two friends at their wedding.
I bought some basil, thyme and English spinach plants from the inner-city Wednesday markets. The basil showed some signs of water stress until I put it out of the direct sun.
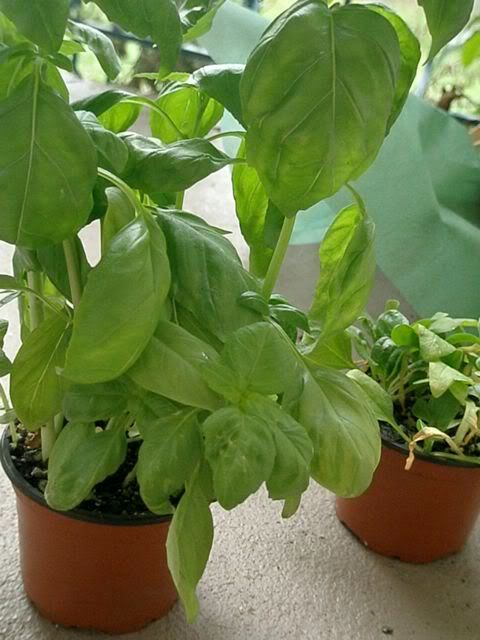
The thyme is thriving beautifully in full sun. The English spinach can't make up it's mind of whether it wants sun or shade... but I think all three badly need to be repotted. I'm constantly learning from my mistakes, so it seems. Not days after I bought these plants I read in a book that you should never buy potted plants which have roots growing out of their watering holes, something that is happening quite badly on two of these plants.
I had word from the breeder that the kitten I had chosen had died suddenly of a stroke or spider bite. I then caught the flu from Rhys. A miserable few days ensued.
While sick with the flu, Rhys cooked me a meal for the first time ever in our relationship. Granted it was only scrambled eggs, but it was a touching gesture from my boy who views the kitchen as foriegn territory which occasionally offers up tasty peace offerings to him. Then both Rhys and our best man Dan did the washing up for me while I was in fitful sleep. I could have cried for happiness when I woke up and realised they'd done it for me.
I've been continuing the long process of knitting a lap blanket and teaching myself new stitches. I'm up to the second 'stripe' of colour. The first stripe was pink in a plain knit. I'm doing the second, light grey stripe in a heavy rib stitch.
My little sister came for a visit from Sydney for her birthday. I was too sick with flu to go to her party or my elder sister's graduation party but did manage to take my little sister to the local markets on Sunday.
I've been learning to food plan before I go a-marketing... but that didn't stop me from getting too excited about the range of vegetables, leading me to buy some I don't actually need. Snow peas in the pod!
So that's a quick write up of everything I've been doing in the last few weeks.
Sunday, June 7, 2009
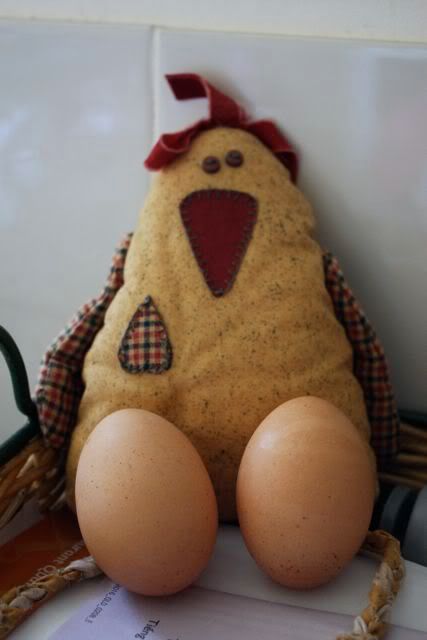
The Humble Goog
goog [gug, gʊg]
noun Australian: an egg.
Origin: 1940–45; orig. uncert.
Common Usage: As full as a goog.
Today while looking through 80 Breakfasts, a beautiful cooking blog, I read how the author had frozen egg whites for later use. Having tossed an egg white yesterday after my passionfruit curd experiment, I thought it would be worth doing some research to find out if this is a safe and practical way to save egg leftovers.
During my internet footwork, I remembered a few things I had learned about eggs in my Home Economics classes at university (I'm a trained Home Ec teacher though I don't work as one!). Then I checked my handy 'ultimate tips' book and found even more useful tips to do with eggs.
So I thought I'd share with you some useful bits of information about the humble goog.

Buying eggs, testing for freshness and keeping eggs fresh for longer.
Eggy leftovers.
Seperating Eggs
Using Eggs.
Hmmm.... when I was a teenager I read that the high levels of protein in eggs is exceptionally wonderful for hair. The book/web site (can't remember now) advocated washing your hair once every so often in fresh egg. This I did once a month for a while and I believe it made my hair softer and glossier but that could have been a placebo effect. I'm susceptible to placebo effects... I wouldn't recommend using eggs straight from the fridge like I did. Nothing feels more disgusting than a chilly egg on your scalp. Really.
Has anyone got any hints or tips about buying, storing, using eggs that I haven't listed here?
noun Australian: an egg.
Origin: 1940–45; orig. uncert.
Common Usage: As full as a goog.
Today while looking through 80 Breakfasts, a beautiful cooking blog, I read how the author had frozen egg whites for later use. Having tossed an egg white yesterday after my passionfruit curd experiment, I thought it would be worth doing some research to find out if this is a safe and practical way to save egg leftovers.
During my internet footwork, I remembered a few things I had learned about eggs in my Home Economics classes at university (I'm a trained Home Ec teacher though I don't work as one!). Then I checked my handy 'ultimate tips' book and found even more useful tips to do with eggs.
So I thought I'd share with you some useful bits of information about the humble goog.
Buying eggs, testing for freshness and keeping eggs fresh for longer.
- When buying eggs from a supermarket take the time to flip open the carton and turn each egg to check that none have already cracked slightly.
- Don't buy eggs that are kept in a warm or bright area of the store. Refrigerated eggs and those kept in darker, cooler areas are safer.
- To check if an egg is fresh, put the egg in a bowl of water. If the egg is super fresh it will sink to the bottom. If the egg floats or stands on its end in the water, it is not as fresh. (WHY? An egg has a tiny pocket of air at one end. As an egg gets older, small amounts of water seep out through the shell and evaporates. This makes the pocket of air get larger and makes the egg more buoyant.)
- If you are camping without refrigeration, you can help eggs keep fresh longer by oiling the egg shell all over. This will help keep the moisture in the egg and the air out.
- If you are producing your own eggs via chicken/duck/bantam/quail keeping don't wash the egg after collection unless excess dirt and poop makes it necessary. When the egg leaves the hen it is covered with a thin film called 'bloom' which will keep the egg fresh longer if it is kept on.
Eggy leftovers.
- Leftover egg yolks can be kept in the fridge for up to three days. Cover the unbroken with a little bit of water and then some plastic wrap over the top of the container. The plastic wrap acts as a 'skin' for the yolk so its own skin doesn't dry out.
- Leftover egg whites can be kept in the fridge for up to seven days or can be frozen.
- Egg yolks can be frozen but they will become gluggy after defrosting and don't work well for cakes or other baked goods. To solve this problem beat in a little sugar to the egg yolk before you freeze it - (as a guide: one tablespoon for 6 eggs).
Seperating Eggs
- To seperate eggs.... cheat like me and get a tuppawear egg seperator. I couldn't live without mine. For shame!
- To seperate eggs without cheating, gently break the egg onto a saucer. You can then place a small cup (maybe a medicine cup size would work) over the yolk and tip the white off into a different bowl.
- When cracking eggs open to seperate them, crack them gently against a thin edge of a cup or bowl. This will create a crevice that you can pry apart with fingers. Too thick an edge (like a wide edged bowl) can cave the egg in and increase the chances of breaking the yolk.
- Rhys' sister Lauren can seperate egg white and yolk by tipping the yolk between the two halves of the egg shell.... but she's a genius and we can't all be so fabulous.
Using Eggs.
- Always, always, ALWAYS crack each egg used in a recipe into a seperate cup or bowl first, not into the bowl with all other eggs and ingredients. This allows any contaminated egg to be detected before it is combined with the others. It also means it you are seperating egg yolk and white that any mishaps don't destroy the batch.
- When beating egg whites to a froth, heat the beaters before hand. This supposedly makes it happen quicker and easier.
- Add a dessertspoon of vinegar to the pan when poaching eggs to prevent the yolk from breaking and to keep the egg white snowy white!
- Adding a pinch of salt or three drops of glycerine to egg whites when beating will make the froth stiffer.
- When beating egg yolks, first rinse the cup/bowl in cold water. This will help the egg yolks slide out rather than stick to the side.
- When poaching eggs put the egg in the shell into the boiling water for a few seconds before breaking the shells.
- When boiling eggs add a 1/4 tsp of salt to the water for every egg. Once cooked, empty out the hot water and add some cold/chilled water to the saucepan of eggs. This will make the shells very easy to peel off.
- When boiling eggs, add the eggs to the water before it is heated up rather than adding them to already boiling water. This will lessen the chances of the eggs bouncing around and splitting. (By the time the water is boiling and the eggs are bouncing, the outer layer of egg white inside the shell will already have hardened a little).
Hmmm.... when I was a teenager I read that the high levels of protein in eggs is exceptionally wonderful for hair. The book/web site (can't remember now) advocated washing your hair once every so often in fresh egg. This I did once a month for a while and I believe it made my hair softer and glossier but that could have been a placebo effect. I'm susceptible to placebo effects... I wouldn't recommend using eggs straight from the fridge like I did. Nothing feels more disgusting than a chilly egg on your scalp. Really.
Has anyone got any hints or tips about buying, storing, using eggs that I haven't listed here?
Saturday, June 6, 2009
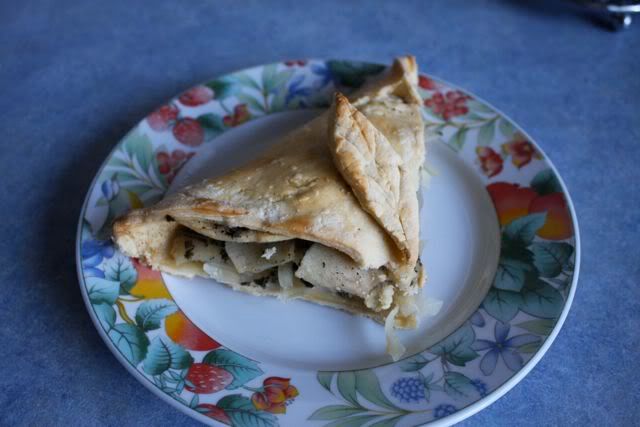
Onion, Apple and Sage Pie
Due to popular demand (on facebook) for this recipe, here it is! The recipe for Onion, Apple and Sage Pie - adapted from the cookbook "Like Grandma Used to Make" by Readers Digest. (I can't recommend this book enough!)

Onion, Apple and Sage Pie
For the pastry:
(or you could 'cheat' and use a sheet of pre-packaged shortcrust pastry.)
In a bowl rub the butter into the flour. Add enough cold water until a very stiff dough is formed. Knead on a floured bench for a minute until smooth. Cover in plastic wrap and chill for 20 - 30 min.
For the pie:
Preheat the oven to 220 degrees (celcius).
Roll the chilled pastry dough out to a square slightly larger than 30cm x 30cm. Trim the edges to neaten the square. I found it useful at this point to gently mark the area I wanted to put the pie fillings in - a smaller square rotated45 degrees and fitted inside the pastry square like a diamond, so that the four corners of the pastry will act like flaps.
Lay the pastry down on a baking tray. Place down a layer of half the onion slices. Top this with a layer of half the apple slices. Sprinkle half of the sage across the apple then dust with half of the mixed salt and pepper. Place a layer of the remaining onion, followed by a layer of the remaining apple slices. Again, top with the remaining sage, salt and pepper.
NOTE: The recipe in the book called for 4 tab sour cream to be put ontop at this point but I had no cream or sour cream in the fridge and this called for the pie to be chilled for another half hour.. and I was hungry. So I left it out. If anyone tries this recipe with the cream I'd love to know how it works out!
Brush the edge of the pastry with milk. Fold two of the corner flaps up over the filling and press together -they should overlap slightly. Fold the other two corner flaps up to meet the other flaps and press together. You may find you have a bit too much filling - gently pull out what you need to so the flaps of the pie can all be folded up neatly.
Use the excess trimmed off pastry to make decorations for the top of the pie (I made leaves and little flower shape. Brush the whole top of the pie with the milk.
Put in the oven and bake until the top of the pie is golden brown.
Onion, Apple and Sage Pie
- 3 small onions, sliced thinly
- 2-3 small apples, peeled, cored, sliced thinly
- 2 tsp fresh sage, chopped finely
- 1/4 tsp of salt
- 1/4 tsp pepper
- 2 cups flour
- 125g butter, softened
- 1 pinch salt
- 3 - 4 tab chilled water
- a little milk for glazing.
For the pastry:
(or you could 'cheat' and use a sheet of pre-packaged shortcrust pastry.)
In a bowl rub the butter into the flour. Add enough cold water until a very stiff dough is formed. Knead on a floured bench for a minute until smooth. Cover in plastic wrap and chill for 20 - 30 min.
For the pie:
Preheat the oven to 220 degrees (celcius).
Roll the chilled pastry dough out to a square slightly larger than 30cm x 30cm. Trim the edges to neaten the square. I found it useful at this point to gently mark the area I wanted to put the pie fillings in - a smaller square rotated45 degrees and fitted inside the pastry square like a diamond, so that the four corners of the pastry will act like flaps.
Lay the pastry down on a baking tray. Place down a layer of half the onion slices. Top this with a layer of half the apple slices. Sprinkle half of the sage across the apple then dust with half of the mixed salt and pepper. Place a layer of the remaining onion, followed by a layer of the remaining apple slices. Again, top with the remaining sage, salt and pepper.
NOTE: The recipe in the book called for 4 tab sour cream to be put ontop at this point but I had no cream or sour cream in the fridge and this called for the pie to be chilled for another half hour.. and I was hungry. So I left it out. If anyone tries this recipe with the cream I'd love to know how it works out!
Brush the edge of the pastry with milk. Fold two of the corner flaps up over the filling and press together -they should overlap slightly. Fold the other two corner flaps up to meet the other flaps and press together. You may find you have a bit too much filling - gently pull out what you need to so the flaps of the pie can all be folded up neatly.
Use the excess trimmed off pastry to make decorations for the top of the pie (I made leaves and little flower shape. Brush the whole top of the pie with the milk.
Put in the oven and bake until the top of the pie is golden brown.
Friday, June 5, 2009
Aluminium Cookware - Tip
If food burns on the bottom of an aluminium pan, cover it with vinegar and add 1 tablespoon of salt. Leave this overnight then scour.
Expanding my Homesteading Library
Today marked the start of the annual Brisbane Lifeline Booksale, an event known and loved by any bibliophile in the South East Queensland area.
Lifeline is a charity organisation which provides a phone counseling/listening/help line for those who need to call someone for guidance and help in times of desperate need. To raise money Lifeline run a chain of op-shops stocked by donation bins. One thing they get donated in the thousands each year is books. So every year they hold this gigantic (and I don't use that word lightly!) booksale where all the books are pooled at one location and sold en masse at very cheap prices. It is an excellent event to hunt down that elusive book you've been seeking or to just pick up a good read. The best part is knowing that the money you spend is going to a good cause.
I went there today with the goal of expanding my library, in particular the non-fiction gardening, homecare, home-making section of said library, which beforehand was thin to non-existant.
Today's haul at $40 was only half of what I'd usually buy but it was still hefty and I was thankful I took a suitcase on wheels to get it home!
Cookbooks
Though I need another cookbook like I need a tonne of chokoes (that is, not at all!) I picked up three which I couldn't resist.
1) The Commonsense Cookery Book (Book 2) ISBN: 0-207-16694-3
This book, used by Home Economics teachers across Australia, is full of classic, simple, basic recipes that won't require a special trip to an international delicatessen to find that elusive, rare ingredient. (You can tell I've been burned by Womens Weekly cookbooks turning too fancy-pants).
2) Food and Cooking in Medieval Britain: History and Recipes. ISBN: 1-85074-081-X.
An English Heritage printed book full of information and recipes straight from the pages of medieval cookbooks. This was bought for my historical reenactment hobby... couldn't resist it at $2.
3) Australian Early Settlers' Household Lore. (no ISBN)
This little charmer of a book is packed from page to page with recipes from the early days of Australia. From old favourites like Scotch Broth and Treacle Pudding to some of the more outlandish creations like Kangeroo Tail soup. This book has it all! But then as I browsed through further I found instructions on things like making cheese and rhubarb wine as well as recipes for home and gardening like a garlic spray for slugs and soap making. Heck, it even has instructions for trying to speculate on the weather via a 'leech barometer' which uses one healthy leech, pure water and a bottle...
Gardening Books
4) Success with Growing Fruit in Containers. ISBN: 0-86411-821-X
5) Success with Growing Vegetables for Pots. ISBN: 0-86411-787-6
Beautifully illustrated with colour photos. Loads of information on which plants will grow well in pots and how to care for them.
6) Growing From Seed. ISBN: 0-86411-946-1
Again, so full of information that it makes my head spin, this book has seed raising techniques and cultivation information with photo illustrated plant descriptions.
7) The Digger's Club Guide to Gardening Success. ISBN: 0-86824-551-8
Produced by my all-time favourite heritage seed supplier in Australia, the Digger's Club!
8) The Woman's Day Vegetable Gardening (too lazy to find ISBN)
Similar information in this book to the other gardening books but it also has a well set out section on pests specific to vegetables with excellent photos.
Home Care, Homesteading, Environmental Concerns Books
9) Clean House, Clean Planet. ISBN: 0-671-53595-1
Information about the chemical products out there and then more information about (and recipes for) the home-made, environmentally friendly and safer alternatives.
10) The Good Life. M. Moody
11) The Good Life in the 90's. M. Moody.
Anyone in Australia who is looking into homesteading, self-sufficient living and simple lifestyle concepts can't help but come across mention of 'The Good Life'. I almost squealed with joy when I found a copy at $3. Then I did squeal when I found her later released book. I bought both.
11) Home Made. ISBN: 0-454-01053-2
An odd little book that can't decide if it wants to be a craft book or a cook book. Excellent recipes for butter, yoghurt, cheese, jam, preserves and various breads.
12) The Ultimate Book of Household Hints. ISBN: 0-85835-818-2
Exactly what the title says. Hints like how to freshen stale bread or how to soften stiff jeans. Peppered with recipes where suitable, like a recipe for playdough or brewer's yeast.
Home Crafts
13) The Harmony Guide to Knitting Stitches. ISBN: 0-7111-0013-6
Very clear pictures on basic knitting and info on how to read knitting patterns. Then there are well over 100 different knitting stitches, each with a photo of the finished fabric.
Because it was Beautiful
14) The County Diary of an Edwardian Lady. ISBN: 0-7181-1581-3
In 1907 Edith Holden kept a naturalist's diary, complete with poetry and gorgeous watercolour paintings of the flora and fauna she saw in her country walks and garden. It has been reproduced in a book format... so lovely! I bought this beacause it was just beautiful but also because it makes me feel relaxed and slowed-down flicking through it.
So there you go! 14 books, many of them in near new condition, for $40. They are all very useful in their own way and I'm pleased with myself for stopping at my budgeted amount where there was so many books left that I wanted! So. Many. Books.
Sunday, May 31, 2009
Macadamias - Storms Provide a Feast
Brisbane and its surrounding areas suffered some serious storms in the last month. Some areas were flooded but my local area only received a week of steady rainfall and strong winds.

I was so excited at harvesting something from my yard that I went a bit gung-ho with getting the nuts to an edible/useable stage. In the process I learnt a few things about harvesting macadamias - unfortunately I learnt it the hard way!
splitting the nut: A normal hand-held nutcracker won't work on these perfectly rounded and very tough nuts. A hammer and a slab of something solid like concrete will do the trick. When I was a kid, we used my dad's wood-vice but opening and closing it for each nut takes a while.
If you do this properly, the nut should split neatly into two halves and you can withdraw the whole nut in one piece.
fact in action: When cracking open the nuts I found that most of them were impossibly hard to get out of the shells. Using my newfound hammering technique I found the shell split perfectly in half but so did the nut itself and the flesh of the nut was swollen to fill the shell and couldn't be wedged out, even with fingernails. This meant that many of my nuts were torn into little shreds by the time I was done. (You can see this in the photo below of the roasted nuts).
But every cloud has a silver lining - and I discovered mine on Thursday.
Our macadamia nut tree in the front yard had been teasing me for weeks with big swags of nuts far out of reach. While doing some gardening I had jealously watched a sulfur crested cockatoo as he alighted on the branches and used his wicked sharp beak to feast on those in the highest branches.
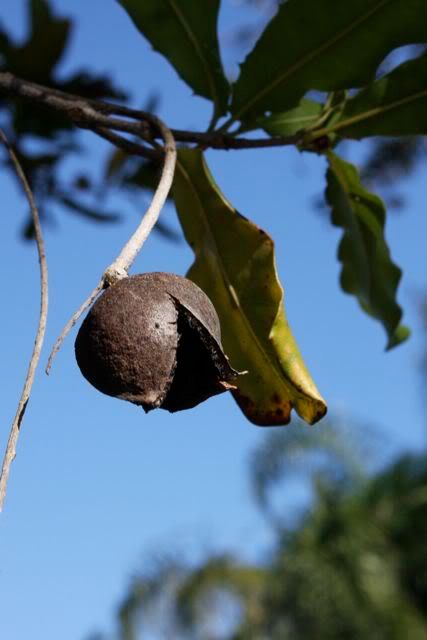
On Thursday following the bad weather I noticed nuts had dropped to the ground. At first I thought it was just a handful but found more and more the longer I searched, scuffed amongst the grass and raked aside leaves and twigs. At the end of my foraging I had a small bucketful - I'd estimate maybe 80 - 90 nuts in total.
Saturday saw me hunched over my prize with a small hammer as I bashed and pried open the nuts. Then, with substantially less nuts intact than I would have hoped for (see notes below) I roasted them in the oven.
THINGS I HAVE LEARNED ABOUT MACADAMIAS
I found the best technique was to place the nut with the line-groove facing upwards. Using a small, craft hammer, I gently hammered the nut until the groove became a crack. Then, turning the nut I continued to hammer along the axis that the crack had started. Don't hammer heavily as you want the nut to split open, not smash inwards.
fact: When first harvested macadamias can be up to 30% water.
fact in action: When cracking open the nuts I found that most of them were impossibly hard to get out of the shells. Using my newfound hammering technique I found the shell split perfectly in half but so did the nut itself and the flesh of the nut was swollen to fill the shell and couldn't be wedged out, even with fingernails. This meant that many of my nuts were torn into little shreds by the time I was done. (You can see this in the photo below of the roasted nuts).
how to fix: Leave the nuts 3 or 4 weeks after harvesting. The nut shrinks a little as the water dries allowing them to stay whole as you split the shell and come out in one piece.

Roasting macadamias is easy and it smells fantastic: Roasting macadamia nuts in the oven is easy. I put them on a baking tray with a 2cm lip, ensuring they were evenly spread and no more than two nuts deep. I put them in a hot (220 degrees celcius) oven. I regularly stirred and tossed the nuts to try to get the roasting even. Apparently macadamias can burn easily so it's best to stay close by when roasting them. But don't worry - once you have the heavenly scent of roasting macadamias you won't want to go anywhere!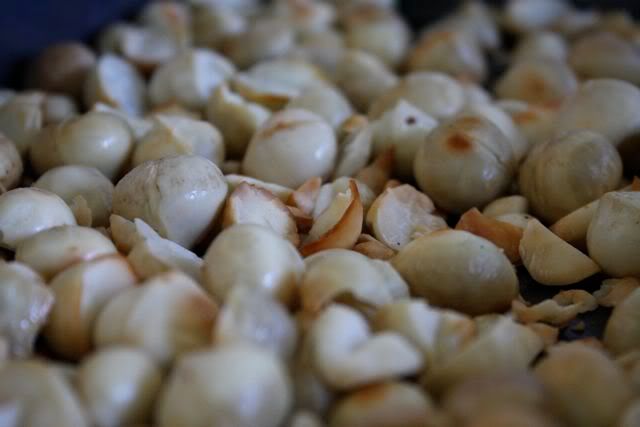
Sunday, May 17, 2009
Slowing Down and Full-Time Work
Many of the blogs I read about living simply speak of 'slowing down' but when you work full time in a job which feels like a pressure cooker of souls, slowing down can be a hard ask if you don't do anything to make it happen.
So I thought I'd share with others some ways that I've found I slow down and bring peace to myself before, during and after work.
Before Work
Wake up early
Though it's getting harder to do when the Winter mornings are longer and colder, I get myself out of bed two hours earlier than used to. This allows me time to have breakfast, make a cup of tea, sit and read my blogroll before getting ready for work. It means that I am not rushing to work, feeling hurried and harried.
Commute in a stress free & productive way
I live a good 20 min drive from the nearest train station. My fiance, Rhys, has a motorcycle which he rides when the weather is good. On those days I drive to the train station and walk through the city to work. Whilst on the train I knit, hand sew, embroider, read, learn Japanese through my headphones and ipod... but mostly I use the time to write letters to friends. On my walk through the city I follow a path that passes beautiful buildings I admire and gardens. I get to work having already done something productive and calming.
On rainy days Rhys and I drive together to his work and then I catch the bus into the city to my work. On these days I get to my office desk worked up and anxious - bad drivers on the roads, poor traffic conditions, poor choices for roadwork times and the general angst of driving at peak hour. Though I (always passenger) use the time to do something productive, it's not as calming when all those stressors are present.
The choice of how you get to work and whether you spend the time wisely, doing things you enjoy, can help you slow down or can stress you up.
At Work
Avoid office politics
Take lunch breaks
It's simple. How can you slow down if you don't give yourself any time at all? At least once I week I make sure I have lunch somewhere outside the office. If it's in the sunlight, all the better.
Take the time for...
Find what calms you at work, what brings a touch of peace to you. Then make sure you take the time to do it. For myself, a cup of tea made from fresh tea leaves is the thing. Drinking tea soothes and the ritual of making tea is calming in itself and takes me from my desk for just a few minutes while I regain a sense of breathing above water. I also listen to music through headphones and occasionally do some work-station yoga with a coworker, which also doubles as a healthy preventative to back and shoulder aches.
After Work
Don't bring it home
I know this rule isn't applicable to every job but where it is possible, don't bring work or work issues home with you. It is hard, I know, because often work troubles prey on your mind and you have no one at work to vent to as freely as you can with your partner or family.
Something Rhys and I used to do is to park just outside the city limits and walk to the car together. While we walked we were allowed to vent on the day. As soon as we got to the car we had to leave it behind and not a word of work was allowed from that point onwards. That way the drive home was spent talking on interesting, more peaceful things and we arrive home with a clear division between work and home.
Have a slow-down ritual
When you get home, or even on the way home, do one thing - or a pattern of things - that calm you down and signal to your brain that it's time to slow down now. Maybe this is to make a cup of tea and sit on the front porch to drink it, admiring the sounds and smells around you. Maybe it's to sit and read your blog-roll. Watch TV. Meditate or pray. Slowly and deliberately get out of your work clothes and into your PJs and slippers. Whatever it is, it needs to be a clear message to yourself that "work's over, slow-down, peace-up".
I recognise this is much easier for a DINK than a parent of a young family but consider what things you can do on the way home from work that will serve you the same way.
Friday, May 15, 2009
Caraway - the forgotten sweet spice
I did a search on www.taste.com.au using the keyword 'carraway' - 0 search results.
Then I realised I was misspelling caraway.
A new search, this time using the correct spelling, 'caraway' - 3 pages of search results.
A search for recipes using caraway's next door neighbor 'cinnamon' - 59 pages of search results.
Poor caraway! So unloved!
Perhaps it is neglected so because it feels safer to bake/cook with those spices we are familiar with or maybe because people don't like to eat things with the little seedpods that get caught in the mouth.
 Caraway seeds dotted in biscuit dough
Whatever the reason, most people I know wouldn't even recognise caraway as a spice. (My fiance thought it was just the name of a street near his work.) Which is a shame, because caraway has a sweet scent and flavour somewhat like anise but not as strong or pungent. I also love the way the little seeds look, so much so that I was inspired to take a photo of the dough rolled out, with shapely caraway seeds prominant.
Yesterday, on a well-earned day off from work, I decided to do some more therapeudic baking. I'd made a caraway biscuit recipe from Cookshelf Baking by Emma Patmore before but was not satisfied with the recipe. The dough didn't come together at all and the cooking time was too short, leaving the cookies unpleasantly doughy. So I did some tweaking of ingredients and baking time and came up with the following:

Caraway Biscuits
Preheat the oven to 150 degrees (celcius) and grease baking trays.
Sift the flour and salt into a large bowl. Rub in the butter. Add the sugar and stir through evenly. Make a well in the center and then add the beaten egg, seeds and enough milk to make a stiff dough.
Roll the dough out on a floured surface until approx. 5mm thin. Cut cookies out and place them on the baking trays.
Bake in the oven for 20 - 25 minutes, turning the tray once for even baking.
Remove from trays and cool on a rack making sure to eat at least one fresh and piping hot from the tray.
These biscuits go very firm so if you prefer a less brittle cookie, eat them warmed up as they soften again beautifully.
Lastly, a word of caution on wildly using caraway in random recipes: though caraway can be used in thick breads (I think it is actually an ingredient in rye bread), it doesn't like yeast so throwing this into your favourite bread recipe may create less than successful results.
Then I realised I was misspelling caraway.
A new search, this time using the correct spelling, 'caraway' - 3 pages of search results.
A search for recipes using caraway's next door neighbor 'cinnamon' - 59 pages of search results.
Poor caraway! So unloved!
Perhaps it is neglected so because it feels safer to bake/cook with those spices we are familiar with or maybe because people don't like to eat things with the little seedpods that get caught in the mouth.
 Caraway seeds dotted in biscuit dough
Whatever the reason, most people I know wouldn't even recognise caraway as a spice. (My fiance thought it was just the name of a street near his work.) Which is a shame, because caraway has a sweet scent and flavour somewhat like anise but not as strong or pungent. I also love the way the little seeds look, so much so that I was inspired to take a photo of the dough rolled out, with shapely caraway seeds prominant.
Yesterday, on a well-earned day off from work, I decided to do some more therapeudic baking. I'd made a caraway biscuit recipe from Cookshelf Baking by Emma Patmore before but was not satisfied with the recipe. The dough didn't come together at all and the cooking time was too short, leaving the cookies unpleasantly doughy. So I did some tweaking of ingredients and baking time and came up with the following:
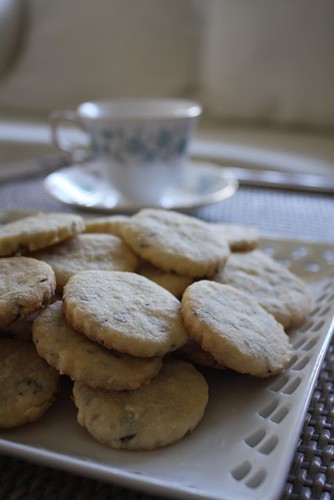
Caraway Biscuits
- 2 cups plain flour
- 1 pinch salt
- 100g butter, chopped and at room temperature
- 1 1/4 cups caster sugar
- 1 egg, beaten
- 2 tab milk
- 2 tab caraway seeds
Preheat the oven to 150 degrees (celcius) and grease baking trays.
Sift the flour and salt into a large bowl. Rub in the butter. Add the sugar and stir through evenly. Make a well in the center and then add the beaten egg, seeds and enough milk to make a stiff dough.
Roll the dough out on a floured surface until approx. 5mm thin. Cut cookies out and place them on the baking trays.
Bake in the oven for 20 - 25 minutes, turning the tray once for even baking.
Remove from trays and cool on a rack making sure to eat at least one fresh and piping hot from the tray.
These biscuits go very firm so if you prefer a less brittle cookie, eat them warmed up as they soften again beautifully.
Lastly, a word of caution on wildly using caraway in random recipes: though caraway can be used in thick breads (I think it is actually an ingredient in rye bread), it doesn't like yeast so throwing this into your favourite bread recipe may create less than successful results.
Thursday, May 14, 2009
A Passion for Passionfruit
A coworker has a passionfruit vine that runs rampant in her back yard and every so often, tired of her rediculously fruitful crop, she brings passionfruits into work for her lucky workmates.
Last week she gave me 9 passionfruits and though I was stoked at getting so many for nothing more than a smile, I was a bit overwhelmed at what to do with them.
The last time she had given me 2 of the fruits and I had used their juicy pulp to make a passionfruit sauce to go over ice-cream. It was seriously tasty but I wanted to try something different. Something that was almost symbolic of my move to home-made life.

And looking through one of my favourite cookbooks Like Grandma Used to Make by Reader's Digest (which I was lucky enough to get 2nd hand at the Brisbane Lifeline Booksale for $15!) I saw recipes for cordials. It was like a light bulb went off above my head.
For my whole life cordial has always been bought from a supermarket. I always had the concept that cordial was some thing that could only be made in a factory with expensive machinery and mysterious secret ingredients. When I read Anne of Green Gables I learned that Marilla had home made cordials but it seemed like some long-lost art along with cheesemaking and fruit preserving. So deciding to make cordial felt liberating, like I was taking something back into the home where it had started.

The cordial recipe I used is below:
Passionfruit Cordial
Add the sugar, water and juice to a saucepan. Bring to the boil and, with lid off, continue to simmer until the liquid has become syrupy. Remove from heat and add the passionfruit pulp.
Set aside for 45 min or until cooled.
Using a strainer, separate the liquid from the pulp. Put the remaining pulp in a large square of kitchen muslin. Squeeze and massage out the liquid still captured in the pulp. Note: Be careful not to let seeds escape. I'd advise using two layers of muslin as mine split a little.
Store the cordial in a sterilised glass bottle in the fridge. Serve with soda water or water.
Last week she gave me 9 passionfruits and though I was stoked at getting so many for nothing more than a smile, I was a bit overwhelmed at what to do with them.
The last time she had given me 2 of the fruits and I had used their juicy pulp to make a passionfruit sauce to go over ice-cream. It was seriously tasty but I wanted to try something different. Something that was almost symbolic of my move to home-made life.
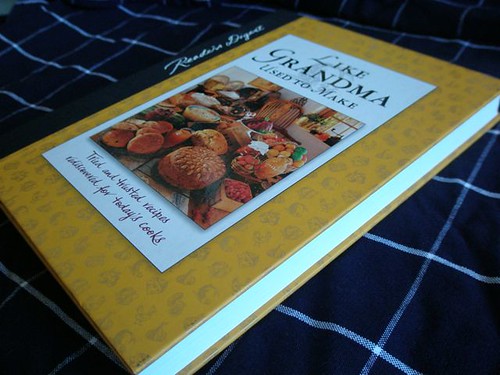
And looking through one of my favourite cookbooks Like Grandma Used to Make by Reader's Digest (which I was lucky enough to get 2nd hand at the Brisbane Lifeline Booksale for $15!) I saw recipes for cordials. It was like a light bulb went off above my head.
For my whole life cordial has always been bought from a supermarket. I always had the concept that cordial was some thing that could only be made in a factory with expensive machinery and mysterious secret ingredients. When I read Anne of Green Gables I learned that Marilla had home made cordials but it seemed like some long-lost art along with cheesemaking and fruit preserving. So deciding to make cordial felt liberating, like I was taking something back into the home where it had started.
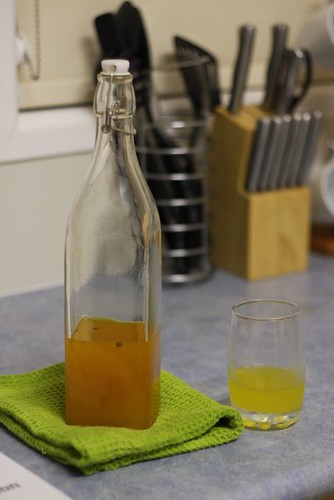
The cordial recipe I used is below:
Passionfruit Cordial
- 1 cup white sugar
- 1/2 cups water
- 1 cup lemon juice
- 1 cup passionfruit pulp (seeds included)
- kitchen muslin/gauze
- soda water to serve.
Add the sugar, water and juice to a saucepan. Bring to the boil and, with lid off, continue to simmer until the liquid has become syrupy. Remove from heat and add the passionfruit pulp.
Set aside for 45 min or until cooled.
Using a strainer, separate the liquid from the pulp. Put the remaining pulp in a large square of kitchen muslin. Squeeze and massage out the liquid still captured in the pulp. Note: Be careful not to let seeds escape. I'd advise using two layers of muslin as mine split a little.
Store the cordial in a sterilised glass bottle in the fridge. Serve with soda water or water.
Monday, May 11, 2009
I've become a worm farmer...
A few weeks ago I splashed out and gave a whole $75 to Bunnings for a worm farm. I liked the look of the 'Can of Worms' farm, one of the more readily available brands of worm farms in Australia, with it's multi-level system, easy tap and decent size. I had a grand old time constructing the farm but with limited spare funds available for setting up this project the worm condo lay empty for another two weeks.
 The Can of Worms set up ready for it's squiggly inhabitants.
This weekend gone by I finally had the spare change and time to buy some inhabitants. I contacted the most local worm farmer I could find and paid her the handsome sum of $35 for 1000 worms. I expected a large bucket-full or even a medium bucket-full of squiggling worker-worms but instead found that 1000 worms fit easily into two Chinese takeaway containers.
The first step in setting up the farm was to give the worms some bedding. Nothing so easy! The 'Can of Worms' comes with a block of coir, shredded coconut husks, to use as bedding. When immersed in a bucket of water the brick expands and can be broken apart to form the worm bedding. You can see in the picture above the beautiful texture of the coir.
The worm condo was now fully set up for its first squiggly inhabitants so I introduced the worms to their new home. They seemed to like it well enough, diving into the coir away from the sunlight. It was only a matter of seconds before they were all hidden away but I managed to get a few photos first.
 Worms quickly escaping underground from the sunlight.
"Why worms?" I've had a few of my friends ask.
Because worms turn kitchen scraps into castings - or worm poop - which is a glorious, organic fertiliser, safe for direct use on the garden. The liquid that gathers in the bottom catcher tray of the worm farm can also be used as a liquid fertiliser. Kitchen scraps that would become methane in landfill instead become part of a natural and healthy cycle.
Because worms will multiply, given time, and can be used for fishing, or be given to our chooks-in-planning as extra-special treats. With enough worms I could even sell on the worms to others.
Because 1000 worms and a worm farm cost me just over $100 but will provide so much back, not just in the form of compost but also as an interesting project, as a way to learn and, as I've already discovered, a path to patience. Nothing happens quickly in a worm farm, with perhaps the exception of their retreat away from sunlight. Waiting for visible results is going to take some patience!
 The Can of Worms set up ready for it's squiggly inhabitants.
This weekend gone by I finally had the spare change and time to buy some inhabitants. I contacted the most local worm farmer I could find and paid her the handsome sum of $35 for 1000 worms. I expected a large bucket-full or even a medium bucket-full of squiggling worker-worms but instead found that 1000 worms fit easily into two Chinese takeaway containers.
The first step in setting up the farm was to give the worms some bedding. Nothing so easy! The 'Can of Worms' comes with a block of coir, shredded coconut husks, to use as bedding. When immersed in a bucket of water the brick expands and can be broken apart to form the worm bedding. You can see in the picture above the beautiful texture of the coir.
The worm condo was now fully set up for its first squiggly inhabitants so I introduced the worms to their new home. They seemed to like it well enough, diving into the coir away from the sunlight. It was only a matter of seconds before they were all hidden away but I managed to get a few photos first.
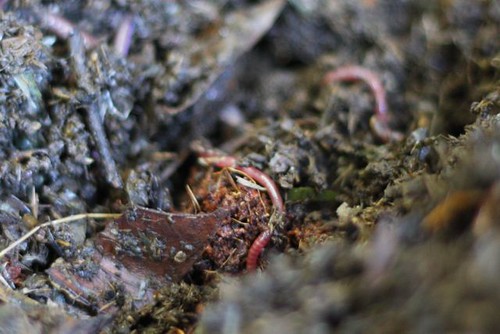 Worms quickly escaping underground from the sunlight.
"Why worms?" I've had a few of my friends ask.
Because worms turn kitchen scraps into castings - or worm poop - which is a glorious, organic fertiliser, safe for direct use on the garden. The liquid that gathers in the bottom catcher tray of the worm farm can also be used as a liquid fertiliser. Kitchen scraps that would become methane in landfill instead become part of a natural and healthy cycle.
Because worms will multiply, given time, and can be used for fishing, or be given to our chooks-in-planning as extra-special treats. With enough worms I could even sell on the worms to others.
Because 1000 worms and a worm farm cost me just over $100 but will provide so much back, not just in the form of compost but also as an interesting project, as a way to learn and, as I've already discovered, a path to patience. Nothing happens quickly in a worm farm, with perhaps the exception of their retreat away from sunlight. Waiting for visible results is going to take some patience!
Wednesday, May 6, 2009
Diet and Sustainability
This evening on the way home from the train station I listened to a seminar broadcast on ABC National Radio. It was hosted by the University of Technology Sydney and the topic was 'Diet, Food and Sustainability'.
It never fails to amaze me how points of matter that arise in discussion of sustainability, frugal living, simple living etc. hit home in one of those light-bulb 'of COURSE' moments.... but are, at the same time, embarrassingly simple.
Some of the points that I found interesting or light-bulb moments were:
I buy my green groceries from our local farmers' market. The market boasts that it is the only one in our local area that restricts sellers to local producers or produced food only. I am not sure how true this is but I'm going with it. It is less distance for me to drive to than other local markets I previously tried out - a lower carbon footprint for me and the sellers.
I have a vegetable garden started (that is... a hole in our turf waiting for soil, mulch and seeds!) and plan to own chickens, both with the aim to be more self sufficient and sustainable.
I drink tap water both at home and at work. Bottled water is a no-no.
I have bought a worm farm - as yet empty of it's squiggly occupants, not yet bought, and plan to pick up a cheap compost bin from the council this week (yay Compost Awareness week!). I plan to use both of these, as ways to reduce the amount of household waste going to the tip and therefore landfill.
It never fails to amaze me how points of matter that arise in discussion of sustainability, frugal living, simple living etc. hit home in one of those light-bulb 'of COURSE' moments.... but are, at the same time, embarrassingly simple.
Some of the points that I found interesting or light-bulb moments were:
- Bottled water is bad mmmkay. Why? Because millions upon millions of those bottles end up in landfill.
- People in today's society have become so 'precious' (the presenter's choice of phrase) that we import navel oranges from California in our Summer when we have no shortage of valencia oranges grown locally. In taste testing sessions people have almost exclusively preferred the taste of the valencia oranges but they don't sell as well as the imported navel oranges... Why? Because navel oranges don't have pips. Because of pips! *facepalm*
- Meat in our daily diet causes a strain on the sustainability of our food supply. Why? Because it takes some very large amount of grain to produce one kilo of meat - which is then often exported from Australia anyway adding a big fat, heavy carbon footprint.
I buy my green groceries from our local farmers' market. The market boasts that it is the only one in our local area that restricts sellers to local producers or produced food only. I am not sure how true this is but I'm going with it. It is less distance for me to drive to than other local markets I previously tried out - a lower carbon footprint for me and the sellers.
I have a vegetable garden started (that is... a hole in our turf waiting for soil, mulch and seeds!) and plan to own chickens, both with the aim to be more self sufficient and sustainable.
I drink tap water both at home and at work. Bottled water is a no-no.
I have bought a worm farm - as yet empty of it's squiggly occupants, not yet bought, and plan to pick up a cheap compost bin from the council this week (yay Compost Awareness week!). I plan to use both of these, as ways to reduce the amount of household waste going to the tip and therefore landfill.
Tuesday, May 5, 2009
Bring on the Soup Weather!
Here in Brisbane the cooler weather has set in, bringing with it the perfectly clear, blue skies that seem to reach forever. When I lived in Japan I couldn't hack the Northern Hemisphere Winter for loss of those blue Winter skies I longed for back home.
Winter doesn't hit us hard in sub-tropical Queensland. There's maybe three or four weeks of rug-up-wear-your-coat weather but the rest of Winter is not so bad.
However, being the cold-frog that I am I enjoy snuggling into blankies, wearing flannel PJs and eating nice hot soup when this time of the year comes on.
So here is the soup I made last night!
Cauliflower, Leek and Capsicum Soup
1 tsp olive oil
1 clove garlic crushed
1 tsp ginger crushed
1 head cauliflower, broken into florets
1 capsicum (I used red), chopped roughly
1 leek - trimmed and sliced
1.5L (6 cups) chicken stock
1/4 tsp cumin powder
1- 2 pinches dried dill
Heat the oil in a large pan. Add garlic, ginger and leek, stirring until leek is tender. Add cauliflower and capsicum and stir over heat for 2 minutes. Add chicken stock, cumin powder and dill. Bring to the boil and simmer over medium heat for 30 minutes or until cauliflower is tender. Puree the soup in batches. Deliciously served with crusty bread and a sprinkling of grated cheese!
Thursday, April 30, 2009
Rice Pudding!
'What is the matter with Mary Jane?
She's crying with all her might and main,
And she won't eat her dinner - rice pudding again -
What is the matter with Mary Jane?
What is the matter with Mary Jane?
I've promised her dolls and a daisy-chain,
And a book about animals - all in vain -
What is the matter with Mary Jane? ...
What is the matter with Mary Jane?
She's perfectly well and she hasn't a pain,
And it's lovely rice pudding for dinner again!
What is the matter with Mary Jane?'
A.A. Milne
Tonight it seems my brain and tummy had a hankering for rice that was not satisfied by the risotto I had reheated for dinner. After finishing a letter to post off to a friend I found myself putting a saucepan on the stove to make rice pudding for dessert.
Rice pudding is something I associate with my childhood when Mum or Grandma would make it for a Winter dessert and serve it piping hot. Perhaps it's the cool weather falling over Brisbane that made me want to try making it, admittedly for the first time. Then again, it might have been an excuse to make something with the rhubarb I bought at the markets last weekend! I've never cooked anything with rhubarb. Infact I've never eaten rhubarb at all!

Creamed Rice Pudding
(serves 3 -4 )
Gradually add rice, stirring. Reduce heat to low and over with a tight fitting lid. Simmer over low heat for 25 minutes stirring occasionally.
Mushy Rhubarb
For a first attempt at rice pudding it was very satisfying and as I sat eating it at the kitchen table in my flanellette PJs I felt like a kid again. I almost looked over my shoulder, expecting Mum to be there, scolding me for not wearing slippers on the chilly floor...
As for the rhubarb, I really enjoyed the flavour, especially mixed with the tartness of the lemon juice. I felt concerned at first that the sugar and small amount of lemon juice would burn or turn to toffee at the bottom of the pan but the rhubarb seemed to shed water as it cooked, especially when I turned the heat up to medium. I'll definitely be buying rhubarb again!
She's crying with all her might and main,
And she won't eat her dinner - rice pudding again -
What is the matter with Mary Jane?
What is the matter with Mary Jane?
I've promised her dolls and a daisy-chain,
And a book about animals - all in vain -
What is the matter with Mary Jane? ...
What is the matter with Mary Jane?
She's perfectly well and she hasn't a pain,
And it's lovely rice pudding for dinner again!
What is the matter with Mary Jane?'
A.A. Milne
Tonight it seems my brain and tummy had a hankering for rice that was not satisfied by the risotto I had reheated for dinner. After finishing a letter to post off to a friend I found myself putting a saucepan on the stove to make rice pudding for dessert.
Rice pudding is something I associate with my childhood when Mum or Grandma would make it for a Winter dessert and serve it piping hot. Perhaps it's the cool weather falling over Brisbane that made me want to try making it, admittedly for the first time. Then again, it might have been an excuse to make something with the rhubarb I bought at the markets last weekend! I've never cooked anything with rhubarb. Infact I've never eaten rhubarb at all!

Creamed Rice Pudding
(serves 3 -4 )
- 2.5 litres milk
- 1/4 cup castor sugar
- 2tsp vanilla essence
- 1 cup white rice (I used long grain)
Gradually add rice, stirring. Reduce heat to low and over with a tight fitting lid. Simmer over low heat for 25 minutes stirring occasionally.
Mushy Rhubarb
- 3 sticks of rhubarb
- 1/4 cup castor sugar
- 1 tsp lemon juice
- 1 tsp cornflour mixed in 2 tbs water.
For a first attempt at rice pudding it was very satisfying and as I sat eating it at the kitchen table in my flanellette PJs I felt like a kid again. I almost looked over my shoulder, expecting Mum to be there, scolding me for not wearing slippers on the chilly floor...
As for the rhubarb, I really enjoyed the flavour, especially mixed with the tartness of the lemon juice. I felt concerned at first that the sugar and small amount of lemon juice would burn or turn to toffee at the bottom of the pan but the rhubarb seemed to shed water as it cooked, especially when I turned the heat up to medium. I'll definitely be buying rhubarb again!
Tuesday, April 28, 2009
Confessions
I wanted to write a post about the way I'd been living for the last three years since my return to Australia from my year in Japan. I believe it will serve as a reminder of where I was before deciding to adopt a simple and green life but more importantly why I changed. It reads like a confession because I'm a bit shamefaced about some of the things I'd been doing.
Forgive me self for I have:
Been a wholehearted consumer, spending my money on anything that whim, fancy or impulse told me to. I have lived from pay to pay with no savings, regularly seeing 30 cents or less in my account with four days left to pay day. My only saving grace is that I always refused to get a credit card, knowing full well how damaging it would be.
Devoted more money than sense into an expensive fashion from Japan, buying dresses worth $200 - $300, sometimes twice in one fortnight. Though it was beautiful and I made some amazing friends through it, I was spent ridiculous amounts of money on clothes that had a time limit on how long I could wear them (read: frilly, doll-like and very cute).
Bought lunch and junk food snacks at work, spending a large portion of my pay on food each fortnight because of it.
Been too lazy in my kitchen to cook real and nutritious meals, instead opting for things like 'fake nachos' (corn chips drizzled with BBQ sauce, sprinkled with cheese and microwaved) pasta meals and takeout pizza. There was a space of 2 - 3 months where I didn't eat a vegetable because it seemed easier to not have to go out to buy them and then prepare them. I am a trained Home Economics teacher with two university units of nutrition under my belt... so I knew better.
Have pandered to my partner's dire eating habits instead of encouraging him to change to more healthy alternatives.
Been lax in house cleaning.
Been ambivalent about the environmental impacts of the products I have used and the waste produced by them.
Been moved by media reports of environmental situations, by 'the documentary that shall not be named' and by a wonderful anime 'Arjuna - Earth Maiden' (watch it if you haven't already!) but then allowed myself to lapse back into a state of inactivity and carelessness.
Been a 'gunna' not a 'doer'
Sunday, April 26, 2009
Threads and Epiphanies
Some people turn to a green or simple life because of an epiphany. Gavin, author of the popular blog 'The Greening of Gavin' is an example of this. The very first post in his blog tells the reader about his massive change of heart and thought after watching the 'environmental documentary that shall not be named.'
Other people turn to a simple life because of an event or new situation - perhaps a breakup, a new family member or a new friend who guides them.
For me, it was a case of small unconnected threads slowly twining together, a change of heart and situation and an epiphany bringing it all.
The threads were: curbing my outrageous spending habits, buying greens from local markets, a love of zakka style home decorating, a long standing but dormant care for the environment, a belief that one person's actions matter, a friend who encouraged me to change my shockingly bad diet to include more vegetables, another friend who invited me to go to local markets with her instead of supermarkets, a good grounding in frugal lifestyle provided by my Mum, another friend who inspired me by paying her homeloan off in a rediculously short time by being frugal and self controlled.
The change of heart was the decision to buy a house and have children when I'd previously said I was not keen to have either in my life.
The change of situation was the recession combined with a wedding to plan and save for.
The impetus that bought it all together? Hearing an interview on ABC's radio program 'Future Tense' which mentioned frugality and simple living. With my love of zakka simple style and my need to save I visited Rhonda Jean's beautiful blog 'down--to--earth'.
Reading it bought a great sense of peace and rightness to my heart. A simple life was where I wanted to head from that moment onwards. As I weaved my way through the internet blog-world I learned more about environmental issues, chemical reduction and gardening and they quickly fell into my plan of what I wanted from my life.
I don't want to give the wrong impression that I am making a 360 degree turnaround on my life or undergoing seachange. The urge towards a simple life has always been part of who I am - the part who has always said that she will retire to a little cottage with ducks, chickens and a goat with a small orchard in her yard, and the part who had things like 'learn to make jam' on a list of things to do this year. I've been saying for months that I wanted a vegetable garden. Now it's simply that I have the guidance on how to do that and enough inspiration from my friends and internet blogroll to start.
Subscribe to:
Posts (Atom)