Sunday, May 31, 2009

Macadamias - Storms Provide a Feast

Brisbane and its surrounding areas suffered some serious storms in the last month. Some areas were flooded but my local area only received a week of steady rainfall and strong winds.

But every cloud has a silver lining - and I discovered mine on Thursday.
Our macadamia nut tree in the front yard had been teasing me for weeks with big swags of nuts far out of reach. While doing some gardening I had jealously watched a sulfur crested cockatoo as he alighted on the branches and used his wicked sharp beak to feast on those in the highest branches.

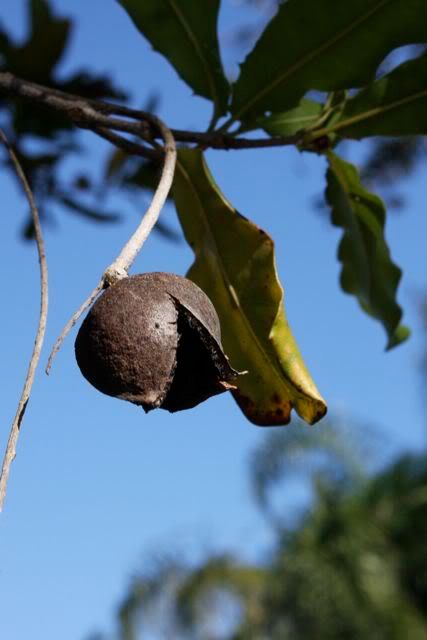
On Thursday following the bad weather I noticed nuts had dropped to the ground. At first I thought it was just a handful but found more and more the longer I searched, scuffed amongst the grass and raked aside leaves and twigs. At the end of my foraging I had a small bucketful - I'd estimate maybe 80 - 90 nuts in total.

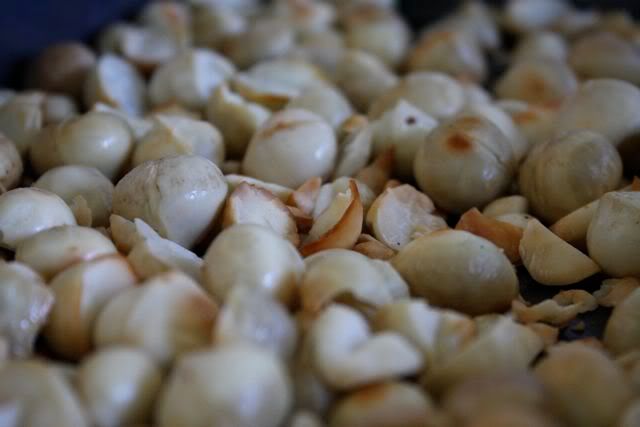
Saturday saw me hunched over my prize with a small hammer as I bashed and pried open the nuts. Then, with substantially less nuts intact than I would have hoped for (see notes below) I roasted them in the oven.


THINGS I HAVE LEARNED ABOUT MACADAMIAS

I was so excited at harvesting something from my yard that I went a bit gung-ho with getting the nuts to an edible/useable stage. In the process I learnt a few things about harvesting macadamias - unfortunately I learnt it the hard way!

splitting the nut: A normal hand-held nutcracker won't work on these perfectly rounded and very tough nuts. A hammer and a slab of something solid like concrete will do the trick. When I was a kid, we used my dad's wood-vice but opening and closing it for each nut takes a while.

I found the best technique was to place the nut with the line-groove facing upwards. Using a small, craft hammer, I gently hammered the nut until the groove became a crack. Then, turning the nut I continued to hammer along the axis that the crack had started. Don't hammer heavily as you want the nut to split open, not smash inwards.

If you do this properly, the nut should split neatly into two halves and you can withdraw the whole nut in one piece.

fact: When first harvested macadamias can be up to 30% water.

fact in action:
When cracking open the nuts I found that most of them were impossibly hard to get out of the shells. Using my newfound hammering technique I found the shell split perfectly in half but so did the nut itself and the flesh of the nut was swollen to fill the shell and couldn't be wedged out, even with fingernails. This meant that many of my nuts were torn into little shreds by the time I was done. (You can see this in the photo below of the roasted nuts).

how to fix: Leave the nuts 3 or 4 weeks after harvesting. The nut shrinks a little as the water dries allowing them to stay whole as you split the shell and come out in one piece.


Roasting macadamias is easy and it smells fantastic: Roasting macadamia nuts in the oven is easy. I put them on a baking tray with a 2cm lip, ensuring they were evenly spread and no more than two nuts deep. I put them in a hot (220 degrees celcius) oven. I regularly stirred and tossed the nuts to try to get the roasting even. Apparently macadamias can burn easily so it's best to stay close by when roasting them. But don't worry - once you have the heavenly scent of roasting macadamias you won't want to go anywhere!


Sunday, May 17, 2009

Slowing Down and Full-Time Work

Many of the blogs I read about living simply speak of 'slowing down' but when you work full time in a job which feels like a pressure cooker of souls, slowing down can be a hard ask if you don't do anything to make it happen.

So I thought I'd share with others some ways that I've found I slow down and bring peace to myself before, during and after work.

Before Work

Wake up early
Though it's getting harder to do when the Winter mornings are longer and colder, I get myself out of bed two hours earlier than used to. This allows me time to have breakfast, make a cup of tea, sit and read my blogroll before getting ready for work. It means that I am not rushing to work, feeling hurried and harried.

Commute in a stress free & productive way
I live a good 20 min drive from the nearest train station. My fiance, Rhys, has a motorcycle which he rides when the weather is good. On those days I drive to the train station and walk through the city to work. Whilst on the train I knit, hand sew, embroider, read, learn Japanese through my headphones and ipod... but mostly I use the time to write letters to friends. On my walk through the city I follow a path that passes beautiful buildings I admire and gardens. I get to work having already done something productive and calming.

On rainy days Rhys and I drive together to his work and then I catch the bus into the city to my work. On these days I get to my office desk worked up and anxious - bad drivers on the roads, poor traffic conditions, poor choices for roadwork times and the general angst of driving at peak hour. Though I (always passenger) use the time to do something productive, it's not as calming when all those stressors are present.

The choice of how you get to work and whether you spend the time wisely, doing things you enjoy, can help you slow down or can stress you up.

At Work

Avoid office politics

Take lunch breaks
It's simple. How can you slow down if you don't give yourself any time at all? At least once I week I make sure I have lunch somewhere outside the office. If it's in the sunlight, all the better.

Take the time for...
Find what calms you at work, what brings a touch of peace to you. Then make sure you take the time to do it. For myself, a cup of tea made from fresh tea leaves is the thing. Drinking tea soothes and the ritual of making tea is calming in itself and takes me from my desk for just a few minutes while I regain a sense of breathing above water. I also listen to music through headphones and occasionally do some work-station yoga with a coworker, which also doubles as a healthy preventative to back and shoulder aches.

After Work

Don't bring it home
I know this rule isn't applicable to every job but where it is possible, don't bring work or work issues home with you. It is hard, I know, because often work troubles prey on your mind and you have no one at work to vent to as freely as you can with your partner or family.

Something Rhys and I used to do is to park just outside the city limits and walk to the car together. While we walked we were allowed to vent on the day. As soon as we got to the car we had to leave it behind and not a word of work was allowed from that point onwards. That way the drive home was spent talking on interesting, more peaceful things and we arrive home with a clear division between work and home.

Have a slow-down ritual
When you get home, or even on the way home, do one thing - or a pattern of things - that calm you down and signal to your brain that it's time to slow down now. Maybe this is to make a cup of tea and sit on the front porch to drink it, admiring the sounds and smells around you. Maybe it's to sit and read your blog-roll. Watch TV. Meditate or pray. Slowly and deliberately get out of your work clothes and into your PJs and slippers. Whatever it is, it needs to be a clear message to yourself that "work's over, slow-down, peace-up".

I recognise this is much easier for a DINK than a parent of a young family but consider what things you can do on the way home from work that will serve you the same way.

Friday, May 15, 2009

Caraway - the forgotten sweet spice

I did a search on www.taste.com.au using the keyword 'carraway' - 0 search results.

Then I realised I was misspelling caraway.

A new search, this time using the correct spelling, 'caraway' - 3 pages of search results.
A search for recipes using caraway's next door neighbor 'cinnamon' - 59 pages of search results.

Poor caraway! So unloved!

Perhaps it is neglected so because it feels safer to bake/cook with those spices we are familiar with or maybe because people don't like to eat things with the little seedpods that get caught in the mouth.

Caraway seeds dotted in biscuit dough

Whatever the reason, most people I know wouldn't even recognise caraway as a spice. (My fiance thought it was just the name of a street near his work.) Which is a shame, because caraway has a sweet scent and flavour somewhat like anise but not as strong or pungent. I also love the way the little seeds look, so much so that I was inspired to take a photo of the dough rolled out, with shapely caraway seeds prominant.

Yesterday, on a well-earned day off from work, I decided to do some more therapeudic baking. I'd made a caraway biscuit recipe from Cookshelf Baking by Emma Patmore before but was not satisfied with the recipe. The dough didn't come together at all and the cooking time was too short, leaving the cookies unpleasantly doughy. So I did some tweaking of ingredients and baking time and came up with the following:


Caraway Biscuits
  • 2 cups plain flour
  • 1 pinch salt
  • 100g butter, chopped and at room temperature
  • 1 1/4 cups caster sugar
  • 1 egg, beaten
  • 2 tab milk
  • 2 tab caraway seeds

Preheat the oven to 150 degrees (celcius) and grease baking trays.

Sift the flour and salt into a large bowl. Rub in the butter. Add the sugar and stir through evenly. Make a well in the center and then add the beaten egg, seeds and enough milk to make a stiff dough.

Roll the dough out on a floured surface until approx. 5mm thin. Cut cookies out and place them on the baking trays.

Bake in the oven for 20 - 25 minutes, turning the tray once for even baking.

Remove from trays and cool on a rack making sure to eat at least one fresh and piping hot from the tray.


These biscuits go very firm so if you prefer a less brittle cookie, eat them warmed up as they soften again beautifully.

Lastly, a word of caution on wildly using caraway in random recipes: though caraway can be used in thick breads (I think it is actually an ingredient in rye bread), it doesn't like yeast so throwing this into your favourite bread recipe may create less than successful results.

Thursday, May 14, 2009

A Passion for Passionfruit

A coworker has a passionfruit vine that runs rampant in her back yard and every so often, tired of her rediculously fruitful crop, she brings passionfruits into work for her lucky workmates.

Last week she gave me 9 passionfruits and though I was stoked at getting so many for nothing more than a smile, I was a bit overwhelmed at what to do with them.

The last time she had given me 2 of the fruits and I had used their juicy pulp to make a passionfruit sauce to go over ice-cream. It was seriously tasty but I wanted to try something different. Something that was almost symbolic of my move to home-made life.


And looking through one of my favourite cookbooks Like Grandma Used to Make by Reader's Digest (which I was lucky enough to get 2nd hand at the Brisbane Lifeline Booksale for $15!) I saw recipes for cordials. It was like a light bulb went off above my head.

For my whole life cordial has always been bought from a supermarket. I always had the concept that cordial was some thing that could only be made in a factory with expensive machinery and mysterious secret ingredients. When I read Anne of Green Gables I learned that Marilla had home made cordials but it seemed like some long-lost art along with cheesemaking and fruit preserving. So deciding to make cordial felt liberating, like I was taking something back into the home where it had started.


The cordial recipe I used is below:

Passionfruit Cordial

  • 1 cup white sugar
  • 1/2 cups water
  • 1 cup lemon juice
  • 1 cup passionfruit pulp (seeds included)
  • kitchen muslin/gauze
  • soda water to serve.


Add the sugar, water and juice to a saucepan. Bring to the boil and, with lid off, continue to simmer until the liquid has become syrupy. Remove from heat and add the passionfruit pulp.

Set aside for 45 min or until cooled.

Using a strainer, separate the liquid from the pulp. Put the remaining pulp in a large square of kitchen muslin. Squeeze and massage out the liquid still captured in the pulp. Note: Be careful not to let seeds escape. I'd advise using two layers of muslin as mine split a little.

Store the cordial in a sterilised glass bottle in the fridge. Serve with soda water or water.

Monday, May 11, 2009

I've become a worm farmer...

A few weeks ago I splashed out and gave a whole $75 to Bunnings for a worm farm. I liked the look of the 'Can of Worms' farm, one of the more readily available brands of worm farms in Australia, with it's multi-level system, easy tap and decent size. I had a grand old time constructing the farm but with limited spare funds available for setting up this project the worm condo lay empty for another two weeks.

The Can of Worms set up ready for it's squiggly inhabitants.

This weekend gone by I finally had the spare change and time to buy some inhabitants. I contacted the most local worm farmer I could find and paid her the handsome sum of $35 for 1000 worms. I expected a large bucket-full or even a medium bucket-full of squiggling worker-worms but instead found that 1000 worms fit easily into two Chinese takeaway containers.

The first step in setting up the farm was to give the worms some bedding. Nothing so easy! The 'Can of Worms' comes with a block of coir, shredded coconut husks, to use as bedding. When immersed in a bucket of water the brick expands and can be broken apart to form the worm bedding. You can see in the picture above the beautiful texture of the coir.

The worm condo was now fully set up for its first squiggly inhabitants so I introduced the worms to their new home. They seemed to like it well enough, diving into the coir away from the sunlight. It was only a matter of seconds before they were all hidden away but I managed to get a few photos first.

Worms quickly escaping underground from the sunlight.

"Why worms?" I've had a few of my friends ask.

Because worms turn kitchen scraps into castings - or worm poop - which is a glorious, organic fertiliser, safe for direct use on the garden. The liquid that gathers in the bottom catcher tray of the worm farm can also be used as a liquid fertiliser. Kitchen scraps that would become methane in landfill instead become part of a natural and healthy cycle.

Because worms will multiply, given time, and can be used for fishing, or be given to our chooks-in-planning as extra-special treats. With enough worms I could even sell on the worms to others.

Because 1000 worms and a worm farm cost me just over $100 but will provide so much back, not just in the form of compost but also as an interesting project, as a way to learn and, as I've already discovered, a path to patience. Nothing happens quickly in a worm farm, with perhaps the exception of their retreat away from sunlight. Waiting for visible results is going to take some patience!

Wednesday, May 6, 2009

Diet and Sustainability

This evening on the way home from the train station I listened to a seminar broadcast on ABC National Radio. It was hosted by the University of Technology Sydney and the topic was 'Diet, Food and Sustainability'.

It never fails to amaze me how points of matter that arise in discussion of sustainability, frugal living, simple living etc. hit home in one of those light-bulb 'of COURSE' moments.... but are, at the same time, embarrassingly simple.

Some of the points that I found interesting or light-bulb moments were:

  1. Bottled water is bad mmmkay. Why? Because millions upon millions of those bottles end up in landfill.
  2. People in today's society have become so 'precious' (the presenter's choice of phrase) that we import navel oranges from California in our Summer when we have no shortage of valencia oranges grown locally. In taste testing sessions people have almost exclusively preferred the taste of the valencia oranges but they don't sell as well as the imported navel oranges... Why? Because navel oranges don't have pips. Because of pips! *facepalm*
  3. Meat in our daily diet causes a strain on the sustainability of our food supply. Why? Because it takes some very large amount of grain to produce one kilo of meat - which is then often exported from Australia anyway adding a big fat, heavy carbon footprint.
It was interesting to think about how our daily choices of food make a difference. It made me consider the things I do (or have started doing recently) to lessen the impact of my household on the environment and to be more sustainable.

I buy my green groceries from our local farmers' market. The market boasts that it is the only one in our local area that restricts sellers to local producers or produced food only. I am not sure how true this is but I'm going with it. It is less distance for me to drive to than other local markets I previously tried out - a lower carbon footprint for me and the sellers.

I have a vegetable garden started (that is... a hole in our turf waiting for soil, mulch and seeds!) and plan to own chickens, both with the aim to be more self sufficient and sustainable.

I drink tap water both at home and at work. Bottled water is a no-no.

I have bought a worm farm - as yet empty of it's squiggly occupants, not yet bought, and plan to pick up a cheap compost bin from the council this week (yay Compost Awareness week!). I plan to use both of these, as ways to reduce the amount of household waste going to the tip and therefore landfill.

Tuesday, May 5, 2009

Bring on the Soup Weather!

Here in Brisbane the cooler weather has set in, bringing with it the perfectly clear, blue skies that seem to reach forever. When I lived in Japan I couldn't hack the Northern Hemisphere Winter for loss of those blue Winter skies I longed for back home.

Winter doesn't hit us hard in sub-tropical Queensland. There's maybe three or four weeks of rug-up-wear-your-coat weather but the rest of Winter is not so bad.

However, being the cold-frog that I am I enjoy snuggling into blankies, wearing flannel PJs and eating nice hot soup when this time of the year comes on.

So here is the soup I made last night!

Cauliflower, Leek and Capsicum Soup

1 tsp olive oil
1 clove garlic crushed
1 tsp ginger crushed
1 head cauliflower, broken into florets
1 capsicum (I used red), chopped roughly
1 leek - trimmed and sliced
1.5L (6 cups) chicken stock
1/4 tsp cumin powder
1- 2 pinches dried dill

Heat the oil in a large pan. Add garlic, ginger and leek, stirring until leek is tender. Add cauliflower and capsicum and stir over heat for 2 minutes. Add chicken stock, cumin powder and dill. Bring to the boil and simmer over medium heat for 30 minutes or until cauliflower is tender. Puree the soup in batches. Deliciously served with crusty bread and a sprinkling of grated cheese!