Less than three weeks in our new home and already I've been able to make the very first harvest from my new garden.
On Christmas Day I made Apple Blossom Cooler, a refreshing non-alcaholic drink recipe by Margaret Fulton. The first step of the recipe requires making a sugar syrup flavoured of cinnamon and mint.
As luck would have it, the previous tenants had over 10 mint plants in the ring of herbs in my back yard. This was the very first 'harvest', if I was to be pedantic about it.
Since then I have also taken oregano for homemade pizza from the herb garden, as well as a few more mint sprigs for a strawberry, ginger and mint cocktail concoction.
I also used my herbs as well as a cutting of cucumber leaves, flowers and tendrils for a herb bouquet to decorate my table for a tiny dinner party on New Years Day.
But supposing that some think that a 'harvest' should involve the picking of a fruit or vegetable, the very first harvest from my new garden is this teeny cherry tomato! It went into a small lunch salad the following day along with some beans picked fresh from my flourishing garden.
Not a big harvest by any means, and though it was all due to the hard work of the previous tenants I still had a little thrill and enjoyed eating something which I had plucked with my own hands.
But how about you folk? How have your gardens been growing? Have you been able to harvest any edibles from them lately?
Showing posts with label harvest. Show all posts
Tuesday, January 8, 2013
Monday, October 18, 2010
Sunday, October 3, 2010
Ode to the First Homegrown Tomato
g r o w i n g ..... impatience
g r o w i n g ..... anticipation
little golden globe
mouth-smoooosh
delectable tang on the tongue
love at first bite.
g r o w i n g ..... anticipation
little golden globe
mouth-smoooosh
delectable tang on the tongue
love at first bite.
Friday, October 1, 2010
But the Produce is More Lovely!
Though I am appreciating the wild beauty of weeds in my yard, I am loving the fruit and vegetables in it much more!

This little capsicum was only just bigger than my fist, and the only one grown on the plant. But it was my first time to grow a capsicum fully until it was red on the plant. I harvested this little guy earlier this week and put him on a homemade pizza, with scone base, baked sweet potato, basil, onion and bacon.

I bought three basil plants for $4 at the bayside markets, a real bargain! I planted them amongst two of my tomato plants to try to tempt the bugs away, sacrificial basil. I've used some on the abovementioned pizza but also made homemade fresh pesto twice now. A handful of basil leaves, a handful of cashews, a sprinkling of parmesan (or pizza cheese if you run out of parmesan as I did today!) and a dash of olive oil. Process the lot for 20 seconds on low then 10 seconds on high and you have a pesto that beats any store bought one hands down.

Last year my mulberry tree went OFF and, again, this year, it hasn't disappointed! Every 2nd morning I duck out before work to pluck down those ripe berries that I can reach. I then spend a few moments staring at the ones near the top of the tree and regret that I have to leave them for the birds! At first I ate them like there was no tommorrow- with yogurt and by themselves at lunch times. Then I decided I should freeze them and try to make a jam or conserve (and a cordial if I have enough leftover). So I have a substantial harvest set aside and frozen for this....

Of all the things I've harvested from my garden recently the peas were the most unexpected. The seeds had germinated almost overnight in a seedling tray and mini greenhouse. Then the plants shot up in a way that gave a new appreciation for the tale of Jack and the Beanstalk!
I replanted them outside only to later read that peas should be planted where they are to grow. I watched as they struggled and slowly turned a sickly yellow green. By the time they had reached a mostly yellow tinge I had completely given up on them.
But one morning, while watering the tomatoes and basil beside them I noticed something green amongst the faded leaves of a plant. A pod! My heart thrilled, I realised there were pods on most of the small dwarf plants. A week later I harvested the small number of pods (about 12 in total), realising that the plants had done as much as they could given my poor care. Each pod only had one or two seeds but they were so sweet, fresh and lovely! It was a delight.

This little capsicum was only just bigger than my fist, and the only one grown on the plant. But it was my first time to grow a capsicum fully until it was red on the plant. I harvested this little guy earlier this week and put him on a homemade pizza, with scone base, baked sweet potato, basil, onion and bacon.

I bought three basil plants for $4 at the bayside markets, a real bargain! I planted them amongst two of my tomato plants to try to tempt the bugs away, sacrificial basil. I've used some on the abovementioned pizza but also made homemade fresh pesto twice now. A handful of basil leaves, a handful of cashews, a sprinkling of parmesan (or pizza cheese if you run out of parmesan as I did today!) and a dash of olive oil. Process the lot for 20 seconds on low then 10 seconds on high and you have a pesto that beats any store bought one hands down.

Last year my mulberry tree went OFF and, again, this year, it hasn't disappointed! Every 2nd morning I duck out before work to pluck down those ripe berries that I can reach. I then spend a few moments staring at the ones near the top of the tree and regret that I have to leave them for the birds! At first I ate them like there was no tommorrow- with yogurt and by themselves at lunch times. Then I decided I should freeze them and try to make a jam or conserve (and a cordial if I have enough leftover). So I have a substantial harvest set aside and frozen for this....

Of all the things I've harvested from my garden recently the peas were the most unexpected. The seeds had germinated almost overnight in a seedling tray and mini greenhouse. Then the plants shot up in a way that gave a new appreciation for the tale of Jack and the Beanstalk!
I replanted them outside only to later read that peas should be planted where they are to grow. I watched as they struggled and slowly turned a sickly yellow green. By the time they had reached a mostly yellow tinge I had completely given up on them.
But one morning, while watering the tomatoes and basil beside them I noticed something green amongst the faded leaves of a plant. A pod! My heart thrilled, I realised there were pods on most of the small dwarf plants. A week later I harvested the small number of pods (about 12 in total), realising that the plants had done as much as they could given my poor care. Each pod only had one or two seeds but they were so sweet, fresh and lovely! It was a delight.
Sunday, May 31, 2009
Macadamias - Storms Provide a Feast
Brisbane and its surrounding areas suffered some serious storms in the last month. Some areas were flooded but my local area only received a week of steady rainfall and strong winds.
I was so excited at harvesting something from my yard that I went a bit gung-ho with getting the nuts to an edible/useable stage. In the process I learnt a few things about harvesting macadamias - unfortunately I learnt it the hard way!
splitting the nut: A normal hand-held nutcracker won't work on these perfectly rounded and very tough nuts. A hammer and a slab of something solid like concrete will do the trick. When I was a kid, we used my dad's wood-vice but opening and closing it for each nut takes a while.
If you do this properly, the nut should split neatly into two halves and you can withdraw the whole nut in one piece.
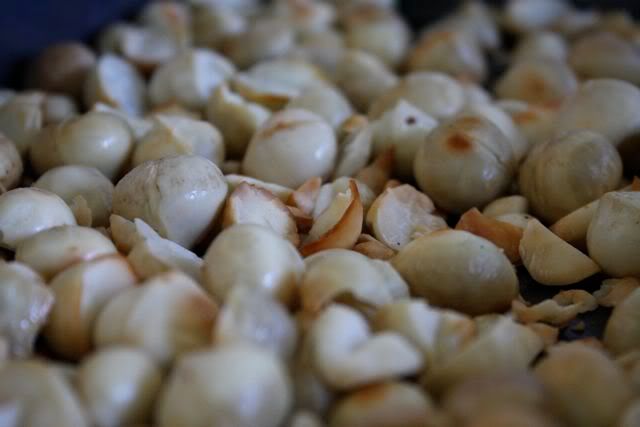
fact in action: When cracking open the nuts I found that most of them were impossibly hard to get out of the shells. Using my newfound hammering technique I found the shell split perfectly in half but so did the nut itself and the flesh of the nut was swollen to fill the shell and couldn't be wedged out, even with fingernails. This meant that many of my nuts were torn into little shreds by the time I was done. (You can see this in the photo below of the roasted nuts).
But every cloud has a silver lining - and I discovered mine on Thursday.
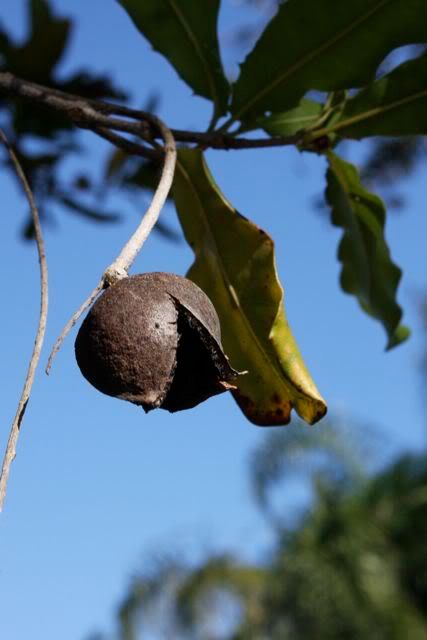
Our macadamia nut tree in the front yard had been teasing me for weeks with big swags of nuts far out of reach. While doing some gardening I had jealously watched a sulfur crested cockatoo as he alighted on the branches and used his wicked sharp beak to feast on those in the highest branches.
On Thursday following the bad weather I noticed nuts had dropped to the ground. At first I thought it was just a handful but found more and more the longer I searched, scuffed amongst the grass and raked aside leaves and twigs. At the end of my foraging I had a small bucketful - I'd estimate maybe 80 - 90 nuts in total.
Saturday saw me hunched over my prize with a small hammer as I bashed and pried open the nuts. Then, with substantially less nuts intact than I would have hoped for (see notes below) I roasted them in the oven.
THINGS I HAVE LEARNED ABOUT MACADAMIAS
I found the best technique was to place the nut with the line-groove facing upwards. Using a small, craft hammer, I gently hammered the nut until the groove became a crack. Then, turning the nut I continued to hammer along the axis that the crack had started. Don't hammer heavily as you want the nut to split open, not smash inwards.
fact: When first harvested macadamias can be up to 30% water.
fact in action: When cracking open the nuts I found that most of them were impossibly hard to get out of the shells. Using my newfound hammering technique I found the shell split perfectly in half but so did the nut itself and the flesh of the nut was swollen to fill the shell and couldn't be wedged out, even with fingernails. This meant that many of my nuts were torn into little shreds by the time I was done. (You can see this in the photo below of the roasted nuts).
how to fix: Leave the nuts 3 or 4 weeks after harvesting. The nut shrinks a little as the water dries allowing them to stay whole as you split the shell and come out in one piece.

Roasting macadamias is easy and it smells fantastic: Roasting macadamia nuts in the oven is easy. I put them on a baking tray with a 2cm lip, ensuring they were evenly spread and no more than two nuts deep. I put them in a hot (220 degrees celcius) oven. I regularly stirred and tossed the nuts to try to get the roasting even. Apparently macadamias can burn easily so it's best to stay close by when roasting them. But don't worry - once you have the heavenly scent of roasting macadamias you won't want to go anywhere!
Subscribe to:
Posts (Atom)